Procedure
The first step in replacing the plastic gears in the late model 944 sunroof is to determine whether one or both of the gears are stripped. If only one of the gears is stripped, it simplifies the replacement process. The gear which has not been stripped can be use as a reference for setting the other lifting arm. First remove the sunroof from the car. If necessary operate the sunroof manually to retract the lifting arms for removal. If you haven't located the motor assembly yet, it is behind the vertical section of carpet in the rear hatch area (behind the hatch compartment light). The carpet is held in place by plastic push plugs. You should be able to slide your fingers behind the carpet and gently pull out to get the plugs out.
Your sunroof motor assembly may or may not have a black plastic cover over it. The cover has four Phillips head screws that hold it in place. There is a black plastic cone shaped dust cover on the drive assembly at the base of the motor. Behind the cover, there are three nuts. The outer two nuts are for adjusting the torque for the motor's slip clutch. The large one in back (21mm) can be turned to move the cable/cam. It is also used to check the torque of the sunroof motor's slip clutch and also how you raise and lower the sunroof if the motor fails. If the nut is rotated in the clockwise direction, it will retract the lifting arms so that the sunroof can be removed. Rotate just enough to get the sunroof out. If one of the gears is still good and the torque on the slip clutch is too high, retracting the lifting arm against the back of the roof may strip the remaining gear.

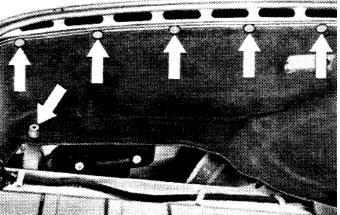
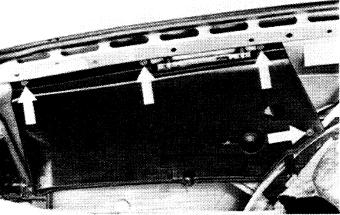
The next step is to disassemble the headliner to get to the lifting arms. There is a cover on the back part of the headliner which is held in place by Phillips head screws. The screws should have plastic covers over them which will have to be pried off to get to the screws. It's easiest to do this with the back seat down and the rear hatch raised while lying on your back in the luggage compartment. Pull back the weather-stripping along the top edge of the hatch. This will expose the back edge of the headliner which is wrapped around the edge of the body. Gently pull the headliner loose from the body all the way across the edge of the hatch. This will expose the lifting arm mechanisms. If you have the new style lifting assembly, there will be the two lifting arm boxes with a single drive cable guide tube along the bottom of both mechanisms. If there is a box between the two mechanisms with several different guide tubes, you have the old style mechanism. This procedure does not cover the old style mechanism.
Carefully remove the lifting arm covers (one at a time) and inspect the gears. Try to keep the gear and the lifting arm from falling out when you remove the cover. If the gear is still good you will be able to use it as a reference for setting the other lifting arm. If one of the gears is good replace the cover. Remove the lifting arm and plastic gear for the ones that are bad. There is a metal washer on the back of the plastic gear which you will need to retain for reinstallation. The grease in the mechanism may cause it to stick in the mechanism housing instead of coming out with the gear.
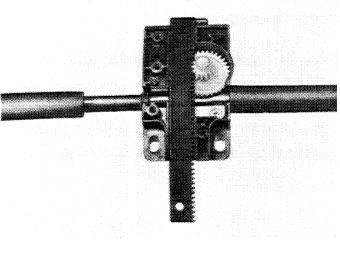
Next, set the sunroof motor assembly so that micro-switch I is made and micro-switch II is not. Here's how you do it. Once the sunroof motor cover is removed you can see the sunroof motor and two of the three limit switches. On the back side of the motor assembly is a white plastic cam that is attached to the end of the cable that operates the lifting arms. As the motor drives the cable, the cam rotates and hits the different micro-switches to stop the lifting arms. The sunroof motor is mounted on its side and has a round drive assembly at one end. With the ignition switch in position 2 and the sunroof installed, depress the up arrow on the console switch until the motor stops. Then depress the down arrow on the console switch until the motor stop. At the motor assembly, there are two micro-switches above the motor. There is a small opening behind the micro-switches that you can see through. If the cam is set properly, you should be able to see the white plastic cam hitting the arm on the bottom micro-switch (should be labeled I). The cam should not yet have hit the arm on the other micro-switch (labeled II). If you are unsure if it is properly set, you can adjust it manually and listen for the micro-switch to click. If you turn the nut counterclockwise the cam will rotate toward the left away from the micro-switch arms. This is just like raising the sunroof. Turn it counter clockwise enough so that you're sure the cam is not hitting the micro-switch. Then turn it back clockwise until it hits the bottom micro-switch arm. You should hear it click. While you're at it, you may want to rotate the cam far enough clockwise to hear micro-switch II click. This isn't a guarantee that both micro-switches are working electrically, but it does verify that they are working mechanically. Once you've done this, set the cam back to where that just micro-switch I (bottom) is made. This is the correct position for the sunroof in the locked position. The reason for verifying that both micro-switch switches click is that the micro-switch mounting assembly sometimes bends so that the cam will not make the micro-switches. If this happens you will have to remove the micro-switches and bend the mounting arm slightly so that the cam will make the micro-switches.
The next thing to do is to mark the lifting arms for installation. If you look at the tracks on the sunroof that the lifting arms slide in to, you'll see a sharp bend almost like a knee. The middle of the curve of the knee is where the round peg on the lifting arm sits when the roof is in the locked position. With the roof installed and closed, lay one of the lifting arms in the track in the lifting element where in normally sits. The lifting element is the box that the lifting arm and the plastic gear sit in. Don't install the gear yet. Slide the element up into the track in the roof until the round peg is in the middle of the knee in the track. Put a mark on the lifting arm where it is lined up with the edge of the lifting element. Bright finger nail polish works well. Remove the lifting arm and mark the other lifting arm in the same spot. You can measure using a ruler, count the teeth on the lifting arm, or hold them side by side to figure out where to mark the other gear.
If you've had sunroof gears strip, one of the critical things you must do is check the torque on the slip clutch. On later style sunroofs, this should be after installing and adjust the gears but before operating the roof to the full open or fully retracted position using the motor. Refer to BODY-03 for slip clutch adjustment.
Now we're ready to install the gears. Remove the sunroof from the car. There should have been a thin metal washer on the back of the old gears. If it is not there it is probably still in the lifting element body. Make sure you put this washer on the back of the new gear before installing. Lubricate the gear with grease before installing. Porsche calls for a special grease (TL-VW 745 Universal Cold Grease). It should be available at the Porsche or Volkswagen dealer. I've never bought the special grease. I just use a good quality, fairly heavy grease. You don't need to apply an excessive amount. Install the gear in the lifting element housing. Insert the lifting arm so the mark on the lifting arm lines up with the edge of the housing (as we had previously measured). Screw the cover in place. Repeat for the other side.
With the ignition key in position 1, carefully bump the up arrow on the console switch and watch the lifting arms. They should retract toward the lifting element housing as if you were going to remove the sunroof from the car. Be VERY careful here. Make sure that as you bump the lifting arms toward the retracted position, the round pegs on the lifting arms reach the element housing at the same time. When the pegs hit the housing, it acts as a mechanical stop. Due to uneven loading, the gears may strip if the arms do not hit the mechanical stop at the same time.
Once you're sure everything is aligned and working correctly, install the sunroof and you're ready to go. I try to made sure the lifting arms are set perfectly and that the torque for the slip clutch is a little low. My gears have been in for about a year and have not stripped yet. And I remove my roof a lot in the summer time. When I first started working on sunroofs, I stripped several sets of gears while trying to get the arms set correctly. However, this was also before I knew how to check the torque on the slip clutch. That's why I told you to order two sets of gears. It's just a little insurance. I always like to keep a spare set of gears handy anyway.
If you find that the roof doesn't lock down tight enough (i.e. the pegs on the arms aren't hitting the right part of the knee in the track) you can adjust this by moving the two micro-switches forward or backward. If you move them forward, the arm will stop more toward the released position. If you move them backward, they will stop more toward the raised position.