BODY-09, Nose/Header Panel - Removal and Installation
Acrobat Printable Version
Introduction
On 924s and 944s between the headlights that holds the Porsche crest is sometimes referred to as the nose panel and sometimes as the header panel. Regardless of what you call it, there are time that it may be necessary to remove it. The panel must be removed to replace the Porsche crest.
On 944 Turbos, the panel must be removed to access the intercooler. And, on the 944 S2, the panel must be removed to replace the air filter. This procedure covers the removal and installation of the nose or header panel on 924s and 944s. On early model 944s,
the nose panel is spot welded in place. To remove the nose panel on these cars, the spot welds must be drilled out. To
reinstall the nose panel, it can be reattached using fasteners similar to the late model cars.
Tools
Phillips Head Screwdriver
1/4" Drive 10mm socket
1/4" Drive 8mm socket
1/4" Drive Short Extension (2 inches)
1/4" Drive Ratchet
1/4" Drive Universal Adapter
Removal
Turn the ignition switch ON.
Turn the headlight switch to the ON position to raise the headlights (you'll be leaving them in the raised position).
Remove the fuse for the head lamp motor:
Early 944s (pre-1985.5) - Fuse 1 Additional Fuse Panel
Late 944s - Fuse 2 on Central Electric Panel
Turn the ignition switch OFF.
If so desired, you can raise the headlamps by removing the fuse listed above and raising the headlights manually using the knurled knob on top of the headlamp motor.
On the early 944s and early 924s, remove the header panel by drilling through all off the spot welds that hold the header panel to the body.
On late model 944s, remove the header panel as follows:
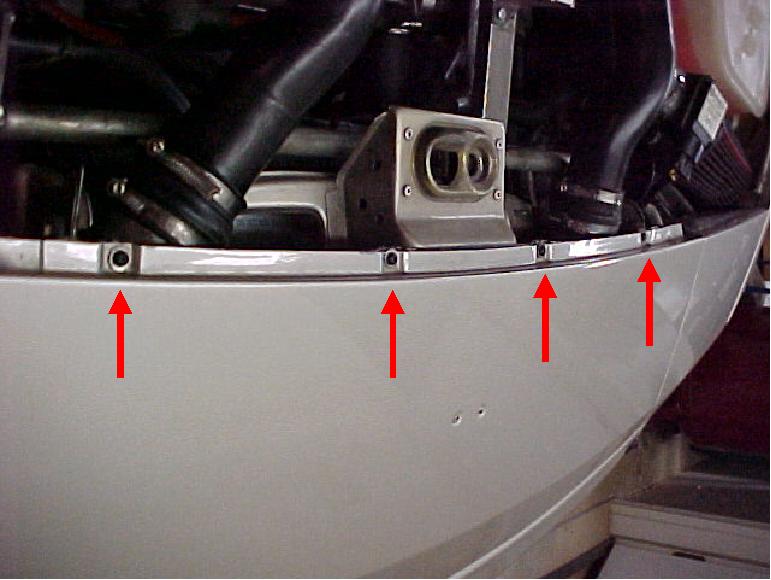
Remove the four Phillips head screws along the back edge of the panel.
Loosen the retaining nuts (8mm) in the bottom of the headlight bucket (2 in each headlight bucket). The nuts do not have to be removed completely. They need only be loosened.
There is a machine screw located under the front lip of the nose panel in each headlight bucket area.
Remove the machine screw under the lip of the nose panel using a 10mm socket, universal, 2 inch extension, and ratchet. A 1/4" Drive 10mm socket is small enough to fit under the lip of the nose panel.
Lift up on the back edge of the panel and side it toward the front of the car to remove.
Installation
If the header panel was removed on an early 944 or early 924, reattach the panel by using fasteners similar to the late 944s (see removal pictures).
Slide the nose panel into place into the headlight buckets. Ensure the washers on the nose panel studs are on top of the bottom panel of the headlight bucket.
Install the machine screw under the front lip of the nose panel.
Install the four Phillips head screws along the back edge of the panel.
Tighten the 8mm retaining nuts in the bottom of each headlight bucket.