BODY-24, Late Model 944 (1985.5 and Newer) Dash Replacement
Acrobat Printable Version
Introduction
Replacing the dash in a late model 944 is not overly difficult. However, it is very tedious and a lot of patience is required. It's going to take a lot of time but, don't let that discourage you. Work slowly, bag and mark all the fasteners, take lots of notes and pictures (to remind you where stuff goes), and you'll do fine.
Tools
Metric Wrench Set
Metric Socket Set
Screwdriver set
T30 Torx Socket (Air Bag Cars Only)
15/16" or 24 mm socket
Paint pen, colored nail polish, or other permanent marker
Needle-nose pliers
Small flat tip screwdriver
Dash Removal
Disconnect the battery negative lead.
Remove the steering wheel as follows:
For car without air bags:
Remove the steering wheel horn pad by pulling firmly on the pad. It'll be tough but, don't worry about breaking it. If you have an aftermarket wheel (i.e. Momo) with a center horn button, gently pry around the outside of the button with a small flat tip screwdriver or probe to dislodge the button from the wheel.
Disconnect the wire from the back of the horn button.
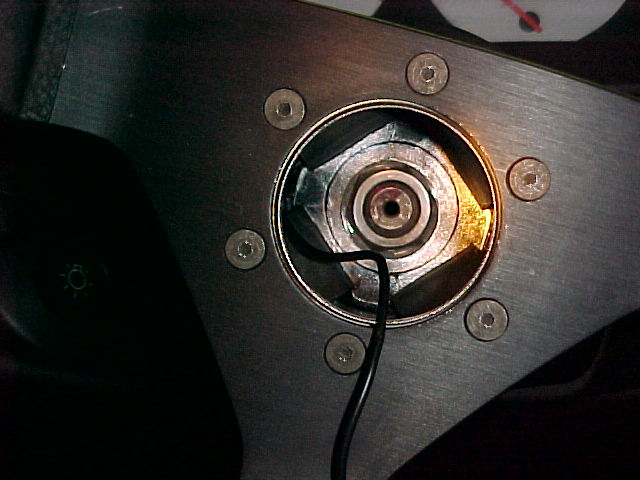
Using a 15/16" (or 24 mm) socket and ratchet, remove the steering wheel retaining nut and the washer behind the nut.
Using a paint pen, finger nail polish, or other appropriate marker, mark the orientation of the steering wheel to the splines on the end of the steering column shaft.
Pull the steering wheel straight off the end of the steering column.
For cars with air bags:
The air bag can be removed after the battery has been disconnected for at least 30 minutes.
On the back side of the steering wheel there are two Torx head screws which are recessed into the back of the column. Using a T30 Torx socket and ratchet, remove the screws.
Slide the air bag assembly off of the front of the steering column and disconnect the plug on the back of the air bag. Set the air bag aside where it can not get damaged (face up).
Using a 15/16" (or 24 mm) socket and ratchet, remove the steering wheel retaining nut and the washer behind the nut.
Using a paint pen, finger nail polish, or other appropriate marker, mark the orientation of the steering wheel to the splines on the end of the steering column shaft.
Pull the steering wheel straight off the end of the steering column.
Remove the gauge cluster as follows:
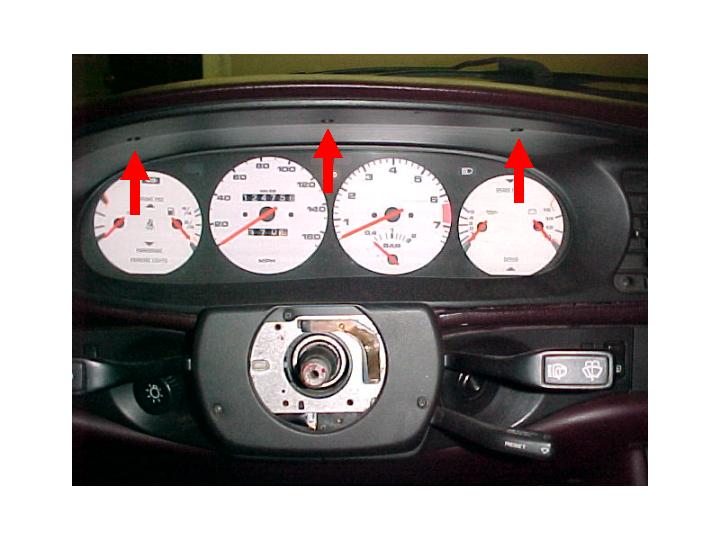
Remove the three Phillips head screws located in the top of the plastic trim piece around the gauge cluster. A stubby Phillips head screwdriver works well here.
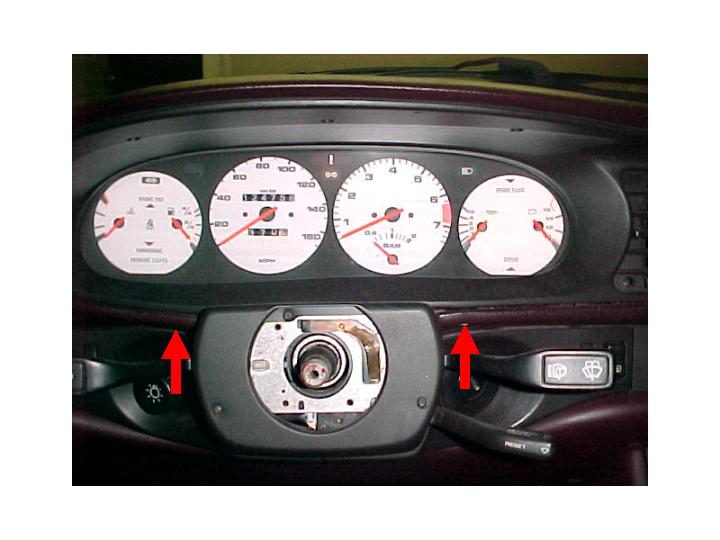
Remove the two Phillips head screws which thread into the plastic trim piece from the bottom on either side of the steering column.
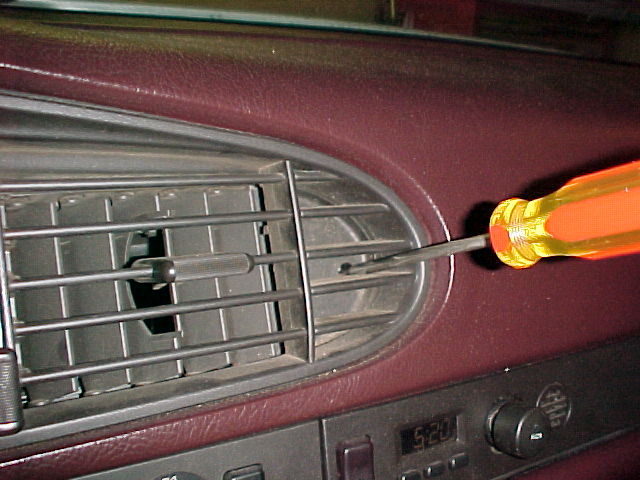
The vents in the center of the dash are an integral part of the trim piece surrounding the instrument cluster. There are several Phillips screws located in the vents which must be removed to remove the instrument cluster trim piece. There is one Phillips head screw located in the vent area to the far right of the instrument cluster. There are two more Phillips head screws located in the vent area closest to the instrument cluster. Remove all three of these screws.
Lift up on the bottom edge of the trim piece right behind the steering column trim piece. This will allow the gauge cluster trim top of the steering column. You may also need to pull down slightly on the top of the trim piece to clear the dash. The instrument cluster trim piece should now slide out of the dash.
With the trim piece removed, you will now see the four Phillips head screws which hold the gauge cluster in the dash. Remove the screws and slide the cluster forward to access the electrical connectors on the back of the cluster.
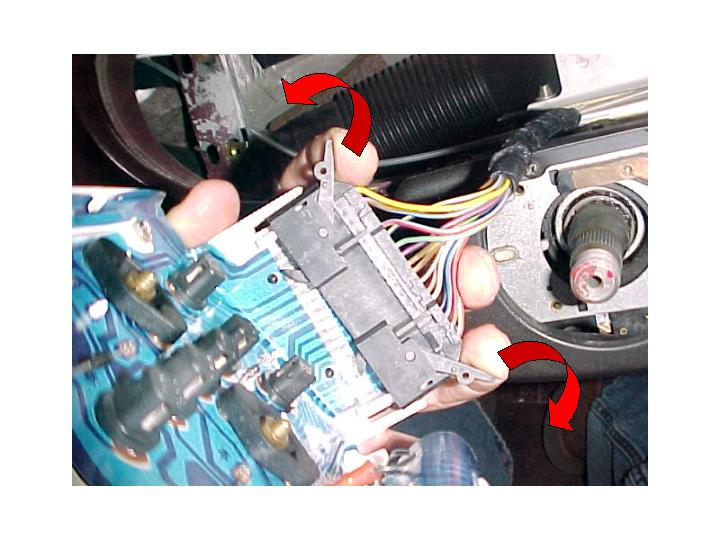
Slide the cluster forward enough to reach the electrical plug connectors on the back of the cluster. Be extremely careful when moving the cluster around and removing it. There is a ribbon circuit board on the back which can easily hang on the edges of the openings in the dash and tear (don't ask how I know). There are three electrical connectors on the back of the cluster. Each has a set of locking levers that hold the plug connector onto the back of the cluster. Push outward on the levers to release each connector and remove it from the back of the cluster.
The instrument cluster will now slide out of the dash. You may have to tilt the cluster back slightly and slide on end out first. You may also need to push up on the instrument cluster opening in the dash to provide enough clearance to slide the cluster out. Be patient. Do not rush. Again, be careful of the ribbon circuit board on the back of the cluster.
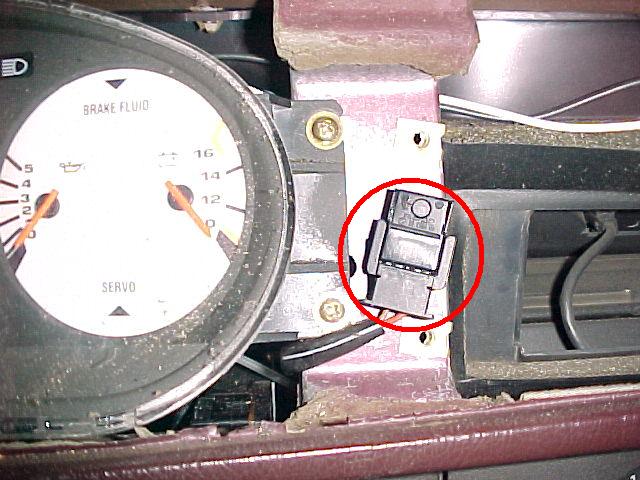
To the right of the instrument cluster is the odometer reset switch. Disconnect it from the dash by pulling it straight away from the dash and then slip it out of the way behind the dash.
Remove the temperature control unit (also known as the climate control unit) as follows:
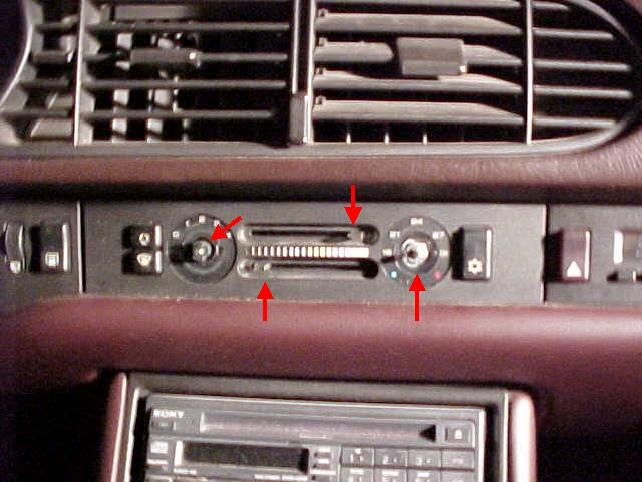
Remove the control knobs (4) for the temperature control unit.
NOTE
Be extremely careful when removing the fan speed control knob. It has a light bulb behind it and it is very easy to break the bulb or the retaining tabs for the stem of the control knob. It may be necessary to slide a small flat tip screwdriver behind the control knob and apply pressure gently while pulling the control knob off the stem.
Remove the temperature controls cover by carefully sliding a small flat tip screwdriver under each outside edge to loosen the trim piece.
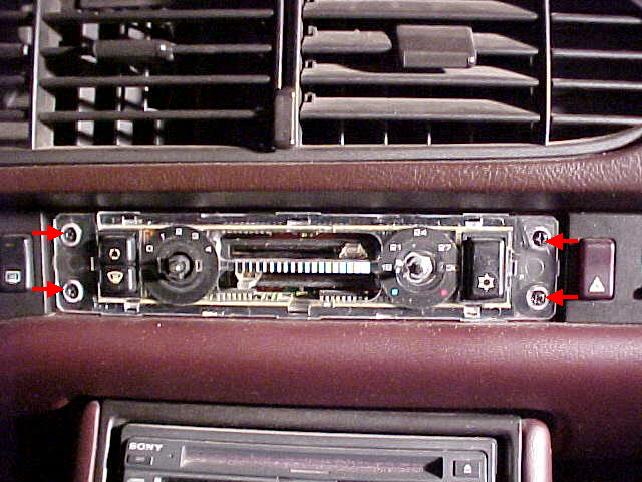
Behind the temperature control unit cover you will find four (4) Phillips head screws which hold the unit in place. Remove the screws to slide the control unit out.
You'll find an electrical connector plug on the back of the temperature control unit. Disconnect the plug and the TCU should slide right out of the dash.
Remove the trim panel above the glove box as follows:
Open the passenger's side door (left-hand drive cars), locate the side trim panel and remove the single Phillips head screw using a stubby Phillips head screwdriver. You will have to slide the panel toward the front of the car slightly to disengage the tabs on the trim piece from the side of the vent.
Remove the two Phillips head screws from the passenger's side vent and remove the vent from the dash.
Behind the side trim panel, you will find three (3) Phillips head screws. Remove the bottom screw which holds the trim panel in place.
Carefully remove the rectangular trim cover next to the passenger side vent control lever using a small flat tip screwdriver.
Behind the trim cover you will find two (2) Phillips head screws which must be removed.
Remove the temperature sensor intake cover by turning the cover 90° counter-clockwise. I used a small set off needle-nose pliers. However, very careful as it's easy to break the vents on the cover.
Remove the single Phillips head screw behind the temperature sensor vent cover.
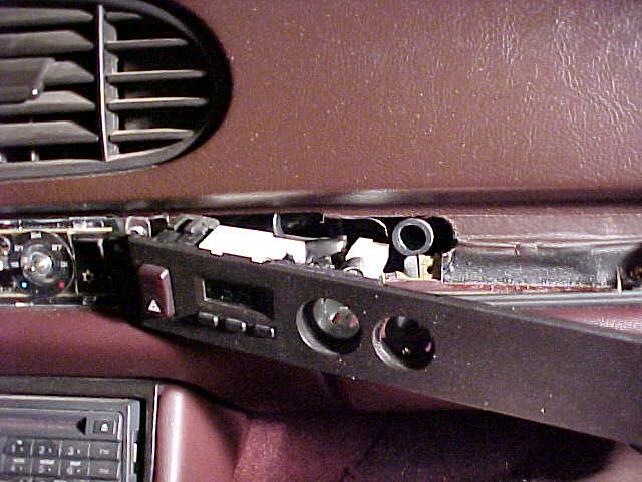
You should now be able to slide the clock, cigarette light, and hazard switch trim piece away from the dash.
On the back of the trim panel disconnect the wires for the clock, cigarette lighter, and hazard switch. Be extremely careful when disconnecting plugs as the retaining clips are plastic and break very easily.
Remove the center console as follows:
Remove the ash tray from the console. Open the lid on the ash tray stick your fingers down inside and pull straight up. It will pull right out of the console.
Remove the two Phillips head screws at the front of the ash tray opening.
Remove the storage pocket from underneath the radio. This is done by forcing both hands inside the pocket pressing your hands out sideways while you pull the pocket out of the dash.
Remove the two Phillips head screws at the bottom of the pocket opening.
Lift up on the console insert that surrounds the gear shift lever. You may have to remove the trim piece from around the radio to remove the console insert.
There are two plastic tabs on either side of the console switches which must be released to disconnect the electrical connector. Use extreme caution when releasing these tabs as they can easily be broken. Nothing will make you angrier than having to replace a perfectly good switch because you've broken off the tabs. The way I release the tabs is to slide small flat tip screwdrivers under both tabs on both sides simultaneously. This releases all four tabs at the same time and the plug should slide off the switch easily.
If your console has a front-to-rear fader knob for the radio, it will likely be wired so that it can not easily be disconnected and removed with the console insert. If that it the case, you'll have to push the fader out of the insert and leave it in the car.
Once you've disconnected the plugs from all of the console switches, remove the spring clip from the gear shift knob and slide the knob off of the shift lever. Set the knob and console insert aside.
Remove the trim ring from around the radio (if your radio has one), slide the radio out of the console, disconnect the plugs from the back of the radio, and remove the radio from the car.
Remove the four Phillips head screws that hold the cassette holder insert in place. Two are located at the back of the ash tray opening. The other two are located at the back of the cassette holder insert. Remove the cassette holder insert from the console.
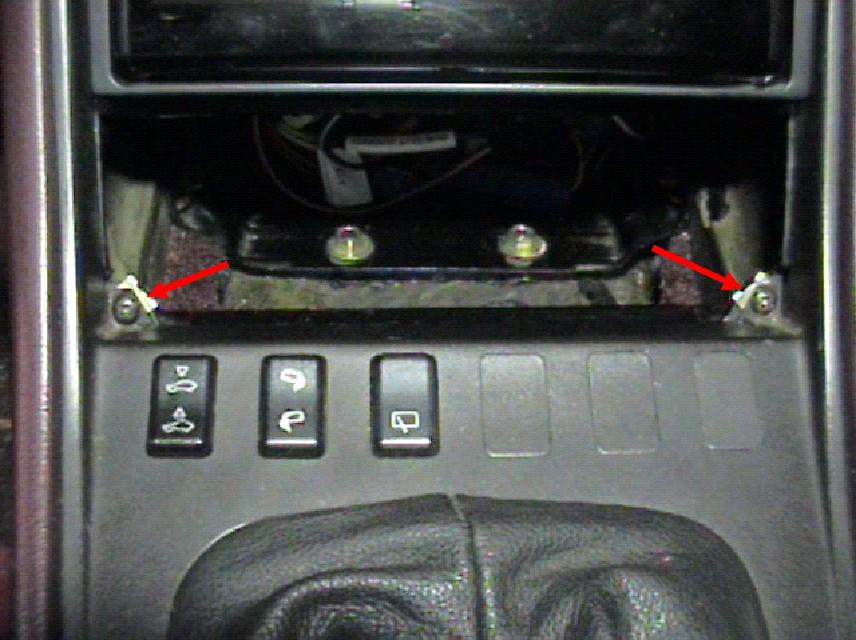
Remove the two screws at the front of the console, one on either side below the main part of the dash. Remove these two screws and you should be able to slide the entire center console toward the rear of the car to remove it.
Remove the two brackets which hold the dash to either side of the torque tube tunnel. The front of the center console attaches to these brackets.
Remove the glove box as follows:
Open the glove box door and remove all of the glove box retaining screws. There are several screws in the front and on the sides of the glove box and two near the glove box light. There's also a clamp at the back of the glove box.
Crawl under the dash and disconnect the hose going into the back of the glove box.
You should now be able to slide the glove box out of the dash. You may have to pull down on the top-front of the box to get it to clear the light.
As soon as you can reach the glove box light wires, disconnect the wires.
If the car is equipped with air bags, reach into the area above where the glove box was removed and disconnect the two red electrical plugs from the back of the passenger's side air bag. Then remove the four Allen head bolts that hold the air bag in the dash and remove the air bag from the car.
Remove the sun visors by remove the three Phillips head screws that hold the pivot end of the visor to the roof panel. Also remove the sunroof visor clips (2 Phillip head screws).
Remove the A-pillar trim as follows:
There are three screws for each A-pillar trim pieces. Each will probably have a plastic cover over the screw hole.
Remove the cover plastic covers for the screws.
Remove the two bottom screws (Phillips head) for the trim piece.
The top screw can be a little difficult to figure out. The natural tendency is to stick the screwdriver into the hole at a 90° angle to the surface of the trim piece. However, to remove the top screw, sit in the car's seat and insert the screwdriver (Phillips head) straight up toward the top of the roof into the hole. You'll have to dig around with the screwdriver to get the tip to engage into the screw.
Once all of the trim piece screws are removed, pull back the weather-stripping that holds the A-pillar trim to the edge of the door frame.
You should now be able to remove the A-pillar trim piece. The roof panel overlaps the top of the trim piece so; you may have to pull down on the roof panel slight to get the A-pillar trim piece to come out.
Remove the steering column trim and switch assembly as follows:
Remove the three Phillips head screws for the turn signal trim and remove the trim piece.
Remove the rubber trim piece which surrounds the ignition switch. Slide a small flat tip screwdriver under the edge of the trim and pry gently to dislodge it from the opening.
Remove the two Phillips head screws for the ignition switch trim, remove the trim piece, and disconnect the wires.
Remove the headlight knob by pulling it gently straight away from the dash.
To the left of the fog light switch there is an oblong plastic cover with a small notch in one of the short sides (usually the top) of the cover. Insert a small flat tip screwdriver into the notch and gently pry on the cover to remove it from the trim piece.
Behind this cover, remove the two Phillips head screws.
With the driver's door open, remove the triangular shaped trim piece on the side of the dash (1 Phillips head screw).
Under the triangular shaped trim piece, you'll find two Phillips head screws which hold the dash trim piece. Remove those screws.
Remove the two Phillips head screws that hold the vent and remove the vent.
Remove the trim piece screw just to the left of the steering column and one on the bottom of the dash.
Remove the nut that holds the headlight switch in the dash and slide the headlight switch out of the back of trim piece (reach behind the dash).
You should now remove the trim piece to the left of the steering column. As you remove the trim, disconnect the wires from the fog light switch.
Remove the switch assembly from the steering column. The assembly is held in place by a collar bolted to the steering column. Remove the bolt and collar and slide the switch assembly off of the column. Disconnect the switch assembly plug as you slide it off of the column.
Remove the dash as follows:
Remove the dash upper mounting screws, one at each A-pillar.
Remove the dash lower mounting screws, one on each side at the bottom of the dash at the outside of each footwell.
Make sure all wires are clear of the dash and remove the dash by pulling it straight back toward the seats. You'll have to remove the side vent ductwork as you pull the dash away from the firewall.
Dash Installation
While you have the dash out of the car, check all of the wiring and components normally hidden behind the dash to make sure they're in good condition.
Install the upper side vents into the new dash.
Maneuver the new dash into position against the felt ledge next to the firewall and install the top mounting screws at the A-pillar.
Reconnect the ventilation ductwork to the side vents.
Install the dash lower mounting screws at the bottom outside of the dash.
If this is an air bag equipped car, install the passenger's side air bag into the dash (four Allen head bolts) and reconnect the two red wiring harness connectors to the air bag.
Install the glove box into the dash. Connect the glove box light wiring, ventilation hose at the back of the glove box, and the clamp at the back of the glove box.
Install the trim piece above the glove box. Reconnect the wiring for the clock, hazard switch, and cigarette lighter as you install the trim piece. Also, make sure that the vent tube for the interior temperature sensor is connected to the trim piece.
Install the passenger's side upper vent (if not already installed) and mount the triangular shaped side trim piece next to the vent.
Reconnect the instrument cluster wiring connectors, insert cluster into dash, and install mounting screws.
Connect odometer reset switch to the dash (just to the right of the instrument cluster).
Install instrument cluster trim piece.
Install the switch assembly onto the steering column and tighten retaining collar. Attach wiring as you install the assembly.
Install the trim to the far left of the dash.
Insert headlight switch through the trim piece, install locking nut, and switch knob.
Install the remainder of the steering column trim. Connect the ignition switch wiring as you install the trim.
Install the rubber trim ring around the ignition switch.
Install the driver's side upper vent (if not already installed). Install the triangular shaped trim piece on the outside of the dash (driver's side).
Install the climate control unit and snap the unit's cover in place.
Install the knobs and slider buttons for the climate control unit.
Install the A-pillar trim pieces.
Install the sun visors.
Install the center console mounting brackets.
Position the center console in the car and install screws (2) at the front on either side of the console.
Reconnect and install the radio.
Install the shift knob with boot and console insert.
Reconnect the console switch plugs.
Install the radio fader switch into the console insert.
Secure the console (4 Phillips head screws).
Install the pocket under the radio.
Install the cassette holder (4 Phillips head screws).
Install the ash tray.
Install the steering wheel onto the column.
Install and tighten steering wheel retaining nut and washer.
If this is an airbag equipped car, reconnect the air bag and install it into the steering wheel.
For cars without air bags, reconnect the horn button or horn pad and install it into the steering wheel.
Reconnect the battery.
If this is an air bag equipped car, you'll have to perform the air bag reset procedure to reset the air bag warning light. On newer 944s (S2) and on the 968 this must be done at the dealer with a Bosch-Hammer diagnostics tool.