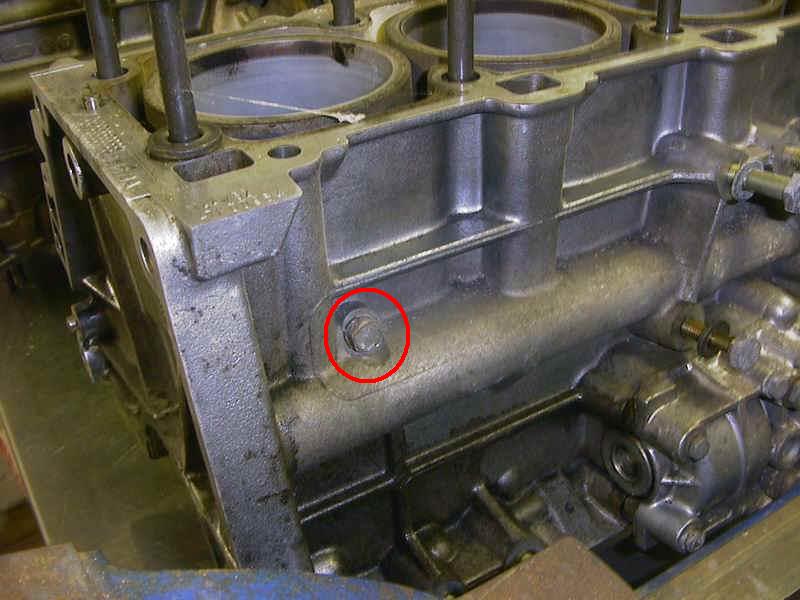
COOL-02, Coolant System Draining, Filling, and Venting


Acrobat Printable Version

Draining the Coolant System

Tools

Draining the cooling system on a 944 can be a very messy job. Due to the location of the drain in close proximity to the bottom radiator cross-member, coolant tends to drain into the lower cross-member, filling it up, and drains out holes at various locations along the bottom of the cross-member. That means you can get coolant draining from several locations under the radiator making it almost impossible to drain the system without making a huge mess. This is further complicated on turbo models where the aerodynamic ground effects extend back from the front of the car directly underneath the radiator. To prevent these draining problems, I usually cut a piece of plastic from an old anti-freeze container or gallon milk jug that is about six inches long and several inches wide (wider if you have a turbo and the ground effects are still under the nose). Fold the ends up on the plastic to channel the coolant and then tape the piece of plastic directly underneath the radiator drain plug using duct tape. The idea is direct the coolant out from the plug toward your drain pan without letting it drip into the cross-member. This isn't a perfect solution as there isn't a lot of room between the bottom of the drain and the cross-member. Just tape it up there and hope for the best.
  1. If the belly pans have not been removed, use the 10mm socket and ratchet to remove the belly pan bolts. A Phillips head screwdriver will also be required on some cars.
  2. Install a device similar to the one described above under the drain plug. Otherwise, be prepared with drain pans (3 should do it) at several locations along the bottom of the radiator. Looking toward the front of the car, the drain plug is at the lower left hand corner of the radiator. It's normally blue in color but, may be discolored with age.
  3. Place a drain pain under the radiator and be prepared with rags to catch any coolant which misses the pan. By the way, in case you didn't already know, keep children and pets away from anti-freeze. It is toxic. That's the other reason you want to clean up spills promptly.
  4. Remove the cap from the coolant expansion tank.
  5. Using the flat tip screwdriver, remove the radiator drain plug. If the drain plug is badly discolored, it's probably very old and should be replaced. Anti-freeze tend to make them very brittle over time and they tend to break off when you're trying to reinstall the plug. If it does break off in the hole, you can usually get it out with a small flat tip screwdriver.
  6. Draining using the drain plug at the bottom of the radiator does NOT completely drain the cooling system. There will still be coolant left in the block in the area around the cylinders. Some maintenance may require draining the cooling system completely. For example, if the coolant an oil have mixed, it is desireable to drain the block completely as well to minimize the number of flushes required to remove all of the oil from the cooling system. If you need to drain the cooling system completely, there is a drain plug on the passenger's side of the block (LHD cars).

    Part Numbers for Radiator Drain Plugs:

    Model Year Description Part Number
    83-86 Drain Plug M10 x 1mm 944 106 353 00 *
    87-91 Drain Plug M10 x 1.5mm 944 106 353 01
    ALL Drain Plug Seal 944 106 354 00 **

     * Also fits early '87 Model 924S
     ** Drain plug seal is included on late model plugs

  • If coolant is to be reused, any debris in the coolant may be removed by straining the coolant though a funnel with a screen. If you don't have a funnel with a screen place a paper towel in the funnel and strain the coolant through the paper towel.

    Filling the Coolant System

    Porsche recommends using a phosphate free anti-freeze in the aluminum engines used on 944s. Standard glycol type anti-freeze which contains phosphates will cause minerals to plate out on the heat transfer surfaces inside the engine. I've read that it isn't really isn't necessary to use phosphate free anti-freeze in the United States because most water systems have a very low mineral content. However, this doesn't take into account those who have private wells. I figure better safe than sorry. Phosphate free anti-freeze used to be a little hard to find. However, it's becoming much easier to find now days. I personally prefer Prestone Extended Life because you can buy it almost anywhere and it's not that expensive relative to other anti-freeze brands. Be suspicious of anti-freeze that says, "Safe for Aluminum Engines" on the label. Unless it specifically says "Phosphate Free" on the label, it probably isn't. Usually a 50-50 anti-freeze and water mixture is good for most climates. However, if you live in an extremely hot or extremely cold climate, check the manufacturer's label for mixing instructions.

    Venting the Coolant System

    Tools

    1. The coolant system vents best if it is at ambient temperature.
    2. Turn the ignition key on and turn the heater control to full heat (i.e. fully clockwise).
    3. Crack open the coolant system high point vent. This is a 12mm bolt located on the coolant nozzle at the front of the cylinder head. It will be near the #1 plug. On the Turbo models the bolt is on the side of the nozzle. On NA models it is on the top of the nozzle.
    4. Place some catch rags around the vent.
    5. At this point there are three different methods to initiate the venting. I will only describe two of them here. The third involves performing "mouth-to-mouth" on the coolant reservoir. Due to the toxic nature of anti-freeze, I don't recommend it and will not describe it's use.

      NOTE

      If you have completely drained the cooling system (using the drain plug on the side of the block) or have had trouble in the past venting the cooling system, you may want to disconnect the upper radiator hose (at the radiator), hold it up in the air, and fill the block by pouring coolant into the hose. It's best if you open the vent at the outlet of the cylinder head so you can tell when the block is full. Do not fill the coolant hose completely as it will make a huge mess when you reconnect it to the radiator. When a good stream of coolant issues from the vent, stop filling and reconnect the radiator hose. Then continue to fill using one of the preferred methods below.

        Method 1 (Pressure Tester - Preferred)

        1. Fill the coolant reservoir to between the minimum and maximum marks.
        2. Obtain a coolant system pressure tester and attach it to the coolant reservoir. If you don't have a tester, many of the better auto parts stores will loan you one.
        3. Pressurize the coolant system slowly until a steady stream of coolant comes out of the vent. Do not exceed 10 psi pressure.
        4. Close the vent.

        Method 2 (Gravity Fill)

        1. Raise the front of the car on jackstands or ramps.
        2. With the high point vent cracked open, slowly fill the coolant reservoir.
        3. When the reservoir level is at or slightly above the maximum mark, coolant should start to come out the high point vent.
        4. Continue to fill until a steady stream of coolant comes out the vent.
        5. Close the high point vent.
        6. The disadvantage to this method is that it is not as effective as Method 1. Also, when venting is complete, there may be more coolant in the reservoir than the system needs. Consequently, the reservoir will overflow due to coolant expansion the first time the car is driven after the vent.

      NOTE

      Since the thermostat is not going to be open when you initially fill the coolant system, the flow path for filling the block is via back flow from the upper radiator hose into the head and the block. This isn't a very efficient flow path for filling and may leave some voids in the head/block area. Therefore, it may be necessary to run the engine until the thermostat opens to flush any voids in the system to the high point (vent).

    6. After the venting is complete, start the car and run it until it reaches normal operating temperature. Place the temperature control for max heat as this will open the heater control valve and flush the heater core of any voids. After running the engine at temperature, vent the system again.

    Clark's Garage © 1998