ELECT-09, Odometer Repair


Acrobat Printable Version

Tools

Parts

Other Procedures Needed

Introduction

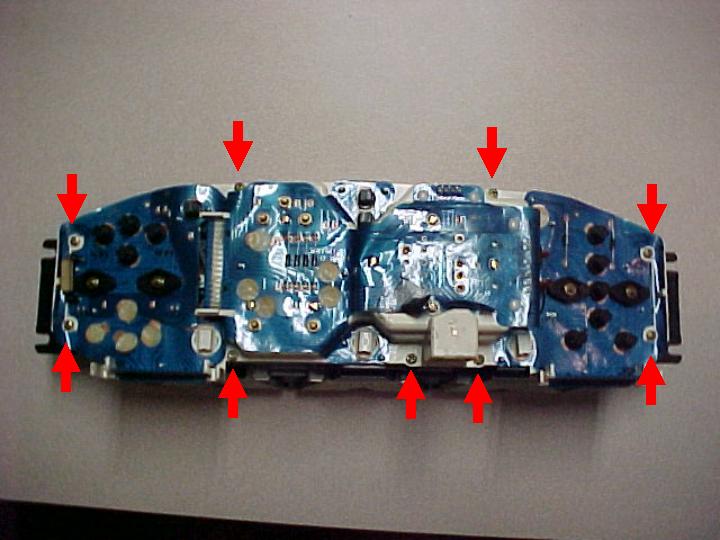
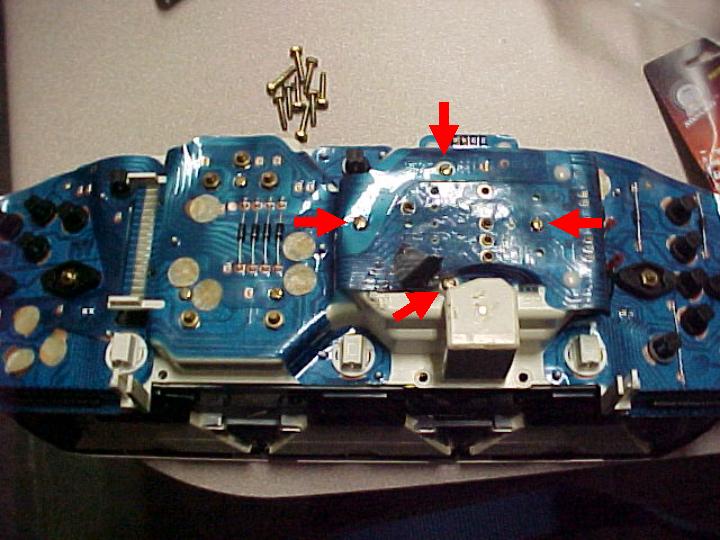
Most of the problems that occur with the odometers on a 944 are the result of reset the trip odometer while the vehicle is moving. You should never do this. Make sure that the car comes to a complete stop before resetting the trip odometer.

There is very little difference between early and late model gauges when it comes to odometer repair. The primary difference is the gauge removal itself and getting to the internals of the speedometer to repair the odometer. Where there are differences they will be discussed in the body of this procedure.

Procedure

  1. Remove the instrument cluster as described in ELECT-07, "Removing Late 944 (1985.5 and newer) Gauge Cluster" OR ELECT-06, "Removing Early 944 Gauges"
  2. For early model 944s (pre-1985.5) perform the following:
    1. Remove the speedometer from the instrument cluster by pushing on the back of the speedometer to push it out of the front of the cluster.
    2. Remove the bezel from the front of the speedometer by prying up on the bezel's back lip with a small flat tip screwdriver. Work around the circumference of the lip until the bezel is free from the unit.
    3. There are several screws on the back of the housing which need to be removed. Once they have been removed the speedometer internals will slide out of the housing.

  3. For late model 944s (1985.5 or newer) perform the following:
    1. Remove the gauge cluster front cover by removing the nine Phillips head screws located along the back edge of the cluster.

    2. Remove the four screws on the back of the instrument cluster directly behind the speedometer. This will allow you to remove the speedometer from the gauge cluster chassis.

  4. From here on the repair for both early and late model cars is the same.
  5. Hold the speedometer facing away from you and look at the left side for a worm gear. For those of you who don't know what a worm gear is, it looks like a white plastic screw. There should be a gear which engages this worm gear to drive the odometer. In all likelihood this gear has slid along the axis of it's shaft and has become disengaged from the worm gear, is worn to the point that it's teeth don't effectively engage the worm gear anymore, or is broken altogether.
  6. If the gear has simply slid off the worm gear, use a small flat tip screwdriver to move it back along the shaft until it is engaged with the worm gear. place a drop of Crazy glue on the shaft where it penetrates the gear to keep it from sliding on the shaft in the future.
  7. If your gear isn't broken or worn, you've completed the repair and may reassemble the gauge cluster.
  8. If the gear is worn or broken, further disassembly of the speedometer is required to replace the gear. If you don't feel comfortable going further with the disassembly, you may send the speedometer off to have it repaired. I recommend sending it to North Hollywood Speedometer or you may contact VDO to find an authorized repair facility near you.

    North Hollywood Speedometer
    6111 Lankershim Blvd.
    North Hollywood, CA 91606
    818-761-5136
    http://www.nhspeedometer.com

    Siemens VDO Automotive
    188 Brooke Rd.
    Winchester, VA 22603
    540-665-0110

    At one time, you could send gauges directly to VDO for repair. Apparently, you now have to go through one of their authorized repair facilities (i.e. NHS is an authorized repair facility).

  9. If you wish to replace the gear yourself you'll first need to obtain a new gear. You may obtain a gear by contacting KLA Industries or Odometer Gears, Ltd. (see Parts section at beginning of procedure) or contacting an authorized VDO repair facility. You'll also find a very good gear replacement procedure with pictures on the KLA web site. Most 1985.5 and newer US model 944s use 20 x 21 tooth gear. However, in some instances you'll find they use a 20 x 22 tooth gear. Early US 944s use a 17 tooth gear and 968s use a 15 tooth gear.

    Odometer Gear Selector
    Model
    Odometer Type
    Gear Type (# Teeth)
    1982-1985 944 USA Mechanical 17
    1985.5-On 944 USA Electronic 20 x 21*
    1985.5-On 944 USA Electronic 20 x 22*
    911 USA Electronic 20 x 30
    968 All Mechanical 15

    * Most 944s with electronic speedometers/odometers use a 20 x 21 tooth odometer gear. However, a small number of 944s use a 20 x 22 tooth gear. You will have to disassemble the speedometer first to determine exactly which gear you need. If the gear has been destroyed to the point it is impossible to determine the number of gear teeth, you may have to purchase two gears and experiment with each to determine the correct gear for your particular car.

  10. After you obtained the replacement gear, you'll need to disassemble the speedometer to replace the gear.
  11. If the speedometer has a mechanical stop (pin) at 0 mph (early 944 gauges), gently lift up the needle on the speedometer over the mechanical stop and allow it to fully release and come to a stop. Mark the full stop position on the gauge face using a pencil or other marking tool which is easily removed when the speedometer is reassembled. If your speedometer does not have a mechanical stop, proceed to the next step.
  12. Gently pry up on the speedometer needle to remove it from its shaft.
  13. Remove the two screws that hold the face plate on the speedometer.
  14. Under the face plate you'll find four screws which you'll need to remove to separate the two halves of the speedometer.
  15. Once the speedometer halves are separated, you'll have access to the gears for the odometer. You'll have to remove most of the gears to get down to the one which needs to be replaced.
  16. The first gear to be removed is the furthest away from the gear to be replaced. It is held in place by a pin which can be pushed out with a small jeweler's screwdriver or small paper clip.
  17. The remaining gears are held in place by small e-clips which are easily removed (of course getting them back on is always a little more difficult).
  18. When you get the bad gear replaced, assembly is just the reverse of disassembly.

Clark's Garage © 1998