The following repair procedure is provided through the courtesy of Raymond Hartle. Ray wrote the following procedure while replacing the power steering rack on his 1987 Porsche 944S. Some minor changes to Ray's original procedure have been made to format it for the web site and to incorporate comments, also provided by Ray, from others who have read and used his procedure. Thanks again to Ray for his valued input to the site.
Foreword by the Author
The following write up is a documentary of my personal experience. It's sole purpose is to help make the job easier for fellow Porsche do-it-yourselfers. I did my best to explain each step completely but make no claims to that effect. Input from veteran Porsche owners Kevin Gross and Charlie Griffith allowed me to be successful. Please do not attempt this job if you are a "shade tree" mechanic. (i.e. novice) Failure to install a steering rack properly will lead to reduced steering capability and loss of vehicle control. Otherwise, roll your sleeves up and get ready to go!
The steering rack used here is a rebuilt long rack from Griffiths Technical, Inc. in Newton, NJ (800-451-7225). The long rack includes new boots and new tie rod ends (not assembled). In addition to the cost of the rack, there is a refundable core charge of $200.00. Shipping was $20.00.
2
Approximate cost per tie rod end if purchased separately.
Park your vehicle in a suitable work space with a minimum of 1 meter clearance around the car.
Apply the parking brake, open the driver's side window, block the rear wheels and disconnect the negative lead of the battery.
Use your choice of 19mm wheel wrench and loosen the front wheel lug nuts just enough to allow easy removal after the tires are off the floor.
Jack each side of the car sequentially at the designated jacking points and place jack stands under the frame rails in the vicinity of the jacking points.
NOTE
Obtain as much ground clearance as possible staying within the manufacturer's recommendations of your equipment. Approximately 18 inches worked fine for me.
Remove the front wheels and set aside. (sounds like we're baking a cake!)
Remove the 7 undercover panel (belly pan) bolts using a 3/8 drive ratchet and 10mm socket, and remove the undercover.
With the car secure, place the catch basin under the power steering pump. Using a 19mm wrench, remove the pressure line from the pump, and allow the power steering fluid to drain into the basin.
Turning the steering wheel lock to lock several times will help void the steering gear of fluid. (aren't you glad you opened the window?) Allow to drain completely.
2.0 - Front Sway Bar Removal
Tools Needed: 13mm socket, 13mm wrench, 17mm wrench, 8 inch long 3/8" drive extension, flat blade screwdriver. Estimated Time Required: 30 minutes
On the passenger side, use a 13mm socket and a 13mm wrench to remove the 2 clamp bolts holding the sway bar to the frame anchor.
On the drivers side, use the 13mm socket on the extension to remove the 2 bolts attaching the sway bar frame anchor to the frame. Removal of the frame anchor provides working clearance for Step 3.
Use the 17mm wrench to remove the nut attaching the sway bar to the control arm on each side, and remove the sway bar. With a screw driver, loosen the clamps on the alternator cool air intake tube and remove it also. You should now have a clear path to the steering gear shaft and universal joint clamp.
On each side, use the 19mm wrench to loosen the locking nut on the tie-rod end ball joint. Turn off the nut until it is just slightly above the end of the stud.
Use a small gear puller to disconnect the tie-rod end from the steering knuckle.
TIP
You may be able to get the tie rod ends to pop out by banging on the end of the steering knuckle, eliminating the need for a gear puller or pickle fork tool. This tip is provided courtesy of John Smaardyk.
NOTE
A pickle fork can be used however this almost always damages the ball joint rubber boot and should be avoided if the tie-rod end is to be reused.
NOTE
If your vehicle uses self locking nuts to secure the tie rod ends, (they have a rounded top and no washer of any kind or cotter pin is employed) I have been told that these must be replaced. The theory is they stretch after one use and are not reliable for reuse. I had zero success finding these locking nuts at any automotive store and substituted standard nuts with locking washers.
4.0 - Disconnect the Steering Column Lower Universal Joint Clamp from the Steering Gear
Tools Needed: 13mm wrench, 13mm socket, 12 inch long 3/8 drive extension, short pry bar. Estimated Time Required: 15 minutes
Turn the steering wheel until the universal clamp bolt head is in line with your access from under the car.
Reach in behind the steering column to put a 13mm wrench on the nut and use the 13mm socket and extension to remove the clamp bolt. The clamp bolt must be completely removed before the universal can be removed from the steering gear.
NOTE
Some light pressure from a small pry bar ( or large screwdriver) should be sufficient to loosen the clamp from the shaft. The universal and clamp will not come all the way off until the steering gear unit is lowered.
5.0 - Rack Removal
Tools Needed: 13mm wrench, 6mm Allen wrench. Estimated Time Required: 15 minutes
Use the 6 mm Allen wrench to remove the return line from the steering gear housing of the rack.
NOTE
I understand some lucky individuals have hex-head hollow bolts. If you have the Allen head like mine and you're unfortunate, the hollow bolt attaching the line will have seized and you will need channel locks to remove it.
TIP
If you have the Allen head hollow bolts, you may want to consider replacing them with hollow hex head bolts which are available from the dealer. It makes it much easier to attach the return hose after the rack is in place as there is room between the rack and cross-member to tighten the bolt with an open end wrench. This tip provided courtesy of John Smaardyk.
Remove the pressure line support clamp from the rack housing and the ground wire that is attached at that location.
Then, with the 13mm wrench, remove the 4 rack mounting bolts.
Slide the rack out of its mounting journals and simultaneously slip off the steering universal joint as you lower the rack assembly.
Since your replacement rack is probably bare, you will need to remove the following items from your old rack for installation on the new rack:
High pressure line support clamp and 10mm bolt
Rack line rubber spacer
Plastic compensating line with two plastic L-shaped fittings (they just pull out)
Left and right side mounts
6.0 - Tie-rod Removal from the Rack
Tools Needed: 3 inch vise, soft jaws, 30 mm wrench, cold chisel. Estimated Time Required: 30 minutes
Label the left and right tie-rod ends for re-assembly.
Pull the boots away from the steering gear housing to expose the rack and inner ball joints of the tie-rod assembly. If your seals were blown as bad as mine, this is another opportunity to get a Dexron II bath!
Extend the driver's side of the rack all the way out. This will expose approximately 75mm (3 inches) of rack teeth which should be clamped tightly into the soft jaws on the vise. I used two pieces of aluminum angle to make soft jaws. If you have a 4 inch vise, you will have to angle the rack in order to get a good grip on the flats of the rack teeth.
NOTE
Mounting the rack in the vise securely is an important step as it is imperative that no pressure be applied to the steering gear mechanism.
At each end of the rack, there is a small locking notch (about 8mm) which should have the flange of the inner ball joint peened into it. Use the cold chisel to carefully remove the peened portion of the flange.
Then, using a 30 mm wrench, or large crescent wrench, remove the tie-rod assemblies from the rack. Both ends are right hand thread, just in case you were wondering.
You can now mail in the old rack and get your core charge back!
7.0 - Tie-rod Installation in the Rack
Tools Needed: 3 inch vise, soft jaws, 30 mm wrench, flat nosed chisel (drift). Estimated Time Required: 30 minutes
Place the new rack in the vise as described in Step 6 taking care not to remove or contaminate the new gear grease.
Screw in the left and right tie-rod assemblies. By making sure the tie-rod assemblies are installed as labeled, your wheel alignment should be satisfactory for a short drive to the alignment shop.
For power steering units, apply 52 ft-lbs of torque to each tie-rod assembly using the 30mm wrench.
NOTE
In lieu of the specialty Porsche torque wrench, a 50 pound pull scale can be used in conjunction with your favorite 30mm wrench. Simply divide the 52 ft-lbs. torque requirement by the distance from the center of the flange nut to the point at which you can anchor the pull scale. This value is the required measure of force which should be applied perpendicular to your wrench via the pull scale. Just pull on the scale until it reads the value you calculated.
The odds are in your favor that an intact portion of the inner ball joint flange will be adjacent to the locking notch. Use a flat punch to peen the flange against the corners of the locking notch. Thread lock products are not recommended.
Remove the rack from the vise and re-install the boots on the steering gear housing.
8.0 - Rack Installation Preparation
Tools Needed: Same as removal. Estimated Time Required: 30 minutes
General Note: The manuals I've seen typically say "Installation is done in the reverse order of removal." This is basically true, however it is simply not that easy in this case.
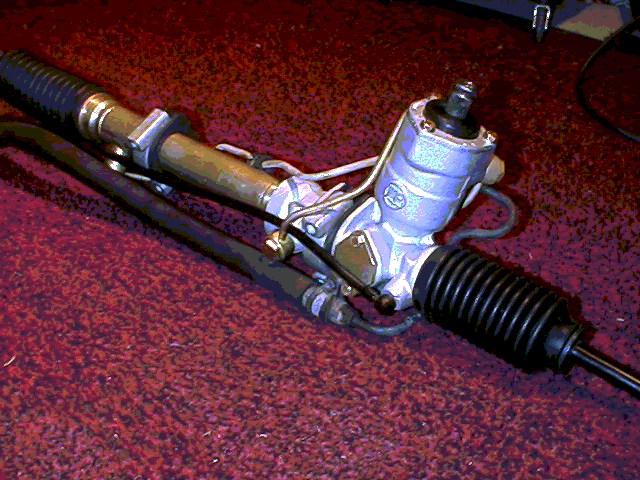
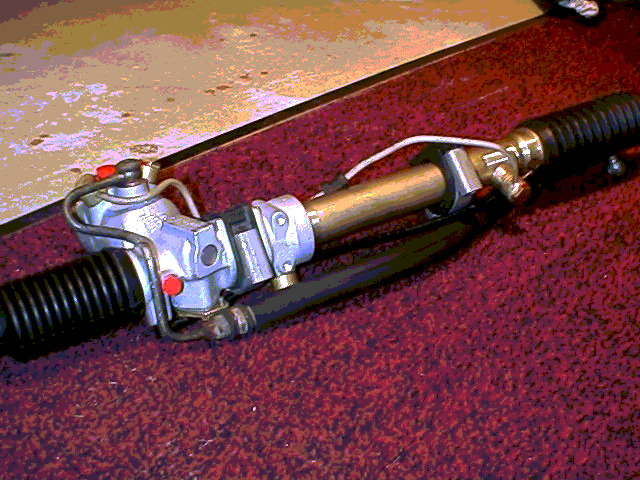
Prior to installation, it is important to get all your original parts back on the new rack. The following assembly order worked for me: (See Photos 1 and 2)
Slide right and left side mounts into place.
Install rubber spacer under the rack line.
Attach high pressure line using new bronze crush washers (torque to 15 ft-lbs) I tightened mine as tight as possible with a 6 inch long 6mm Allen wrench.
Loosely attach support clamp with 10mm bolt. (you will have to remove it later)
Insert the L-shaped fittings on the ends of the compensating line.
Snake the compensating line into position and firmly push the fittings into place on the rack housing.
9.0 - Rack Installation
Tools Needed: Same as removal plus optional 10x1x35mm bolt and a grinder. Estimated Time Required: 60 minutes
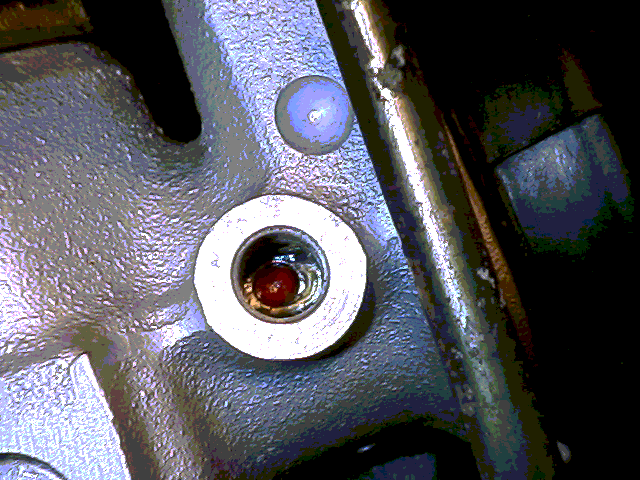
First center the rack. This is done by removing the threaded plastic plug from the view port on the underside of the steering gear housing and turning the steering shaft until a red dimple in the rack gear is in alignment with the view port. (see photo No. 3)
Once in alignment, thread a 10x1x35+/-mm bolt into the view port to lock the rack in the centered position. The bolt should have a smooth tapered end to engage the dimple. (fire up the grinder!)
TIP
Instead of fabricating a locking bolt with a tapered end, you may want to try inserting a ball bearing into the view port hole to engage the dimple and threading an unaltered bolt into the hole to lock the ball bearing in place. This tip is provided courtesy of John Smaardyk.
With this accomplished, place the rack assembly into position on the passenger side of the car and finger tighten one of the passenger side mounting bolts. Allow the driver's side to hang down slightly.
Next, reach in the window of the car and turn the steering wheel until it is straight. You may want to have and assistant hold the steering wheel straight for you. (my daughter did an excellent job!)
At this point, the open side of the universal clamp should be in generally good alignment with the flat side of the steering gear shaft.
Align the split in the clamp exactly in the center of the shaft flat. If you don't, the clamp bolt cannot be installed.
With the steering column universal joint clamp positioned over the steering gear shaft, push the rack assembly up into position. The universal clamp will now slide down the steering gear shaft where it belongs.
Install and hand tighten the upper driver's side mounting bolt. If the universal clamp did not side into position completely, use a small hammer and lightly tap it down until none of the flat is visible beneath the clamp. (believe it or not there is room to do this!)
Install and tighten the clamp bolt. Install and finger tighten the remaining two mounting bolts.
Getting the mounting bolts aligned and finger tightened is a bit of a chore but absolutely necessary to avoid cross threading the aluminum cross member.
Tighten the rack mounting bolts to about 23 Nm (17 ft-lbs).
Install the high pressure line mounting clamp and ground wire.
Attach the high pressure line to the power steering pump using new bronze crush washers. (torque to 33 ft-lbs)
Attach the return line to the rack housing using new bronze crush washers. (torque to 15 ft-lbs.)
Use a plastic tie wrap to bundle the high pressure line and compensating line to the rack. The wrap should be placed at the same location as the rubber rack line spacer.
Remove your custom centering bolt (if you used one), then replace and tighten the view port plastic plug.
Connect the tie rods to the steering knuckles tightening the locking nuts to about 30 ft-lbs. You will need to apply sufficient pressure to the tie rod end ball joint shaft to prevent it from turning in the knuckle. I used the same small puller I took them apart with and a flat "cushion" plate on the bottom of the tie rod end.
Install the fresh air tube and the driver's side sway bar mounting bracket.
Next, install the sway bar. This must be done by connecting the ends first. The sway bar to control arm mounting bolts should be tightened to 18 ft-lbs.
Then using a jack, raise the sway bar until the mounting clamps are in alignment with mounting brackets. Be sure both sides go into the proper position simultaneously. Install the clamp bolts and tightened to 17 ft-lbs.
10.0 - Bleeding The System
Tools Needed: NA Estimated Time Required: 30 minutes
Install the wheels and lower the car off the jacks.
Fill the power steering reservoir with Dexron II or III automatic transmission fluid.
Reconnect the battery and start the car.
Wait a few minutes to give the fluid time to find its way.
Bleed the air from the new rack lines by slowly turning the steering lock to lock until no more air bubbles appear in the reservoir and the fluid level remains constant.
As a final check, compare the fluid level in the reservoir with the engine stopped and with the engine running. If the fluid level rises more than 10mm, there is still air in the system and you should repeat the bleeding process.
Once this is complete, you're back on the road and off to the alignment shop.
Congratulations you just saved yourself $????? and learned something new as well.