SUSP-09, Rear Wheel Bearing Replacement - Steel Trailing Arm
Acrobat Printable Version
Introduction
I'd like to thank Ben Davis for providing the pictures for this procedure. Ben took the time to take pictures as he was performing this procedure. The addition of his pictures has made this a much better procedure.
Tools
36 mm socket
8 mm Cheesehead (Triple Square) tool
Metric socket set
Phillips head screwdriver
Jack stands
Floor jack
Gear puller or block of wood and hammer (for removing the stub axle)
Seal puller
Soft drift and hammer (for driving out wheel bearings)
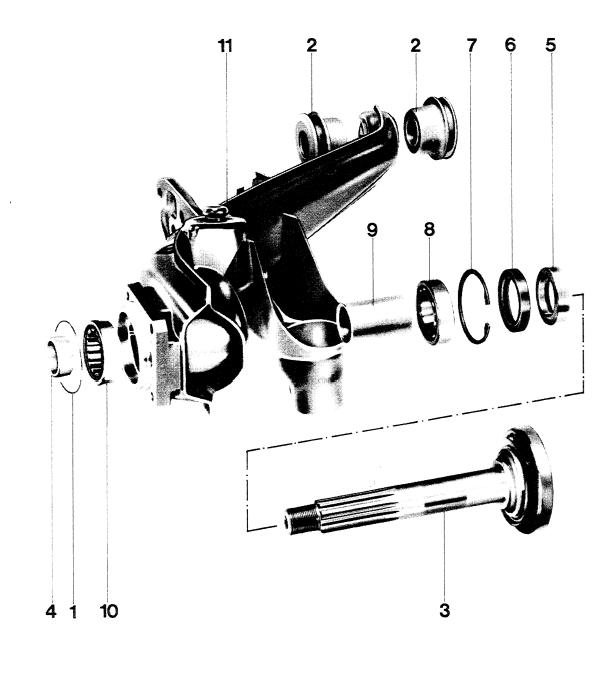
Outer seal
Trailing arm mount
Stub axle
Outer bearing inner race
Inner bearing spacer
Inner bearing seal
Snap ring
Inner bearing
Spacer tube
Outer bearing
Trailing arm
Procedure
NOTE
The hardest part of this job may be getting the rear wheel axle nut loose. The reason being is that the axle nut is torqued to 350 ft-lbs. That means if you're using an 18" breaker bar to remove the nut, you have to apply 233 lbs. of weight to the end of the bar. If you're using a 24" breaker bar, you have to apply 175 lbs. of weight to the end of the bar. The problem is that over time, the threads of the axle/nut get a little rust built up on them and then it takes significantly more force than the 350 ft-lb. tightening torque to break the nut free. Sometimes this can double the amount of torque required.
With that in mind, if we assume that the amount of torque required to remove the axle nut has doubled to 700 ft-lbs., it may require a breaker bar as long as 4 feet (48") to get the required weight applied to the end of the breaker bar down to where and average sized individual (175 lbs.) can apply enough force to break the nut free.
I had an experience one time on my own car where I was trying the break the axle nut free where even with a 4 foot breaker bar and myself and a friend standing on the bar, we were unable to break the nut free. Finally, the only way I was able to free the axle nut was to drive the car to a shop that does tires for very large trucks. They loosened both axle nuts using a 3/4" Drive Impact Wrench and then retighten them with a 1/2" Drive Impact Wrench. Then, I drove the car back to my shop where I completed the job. So, if the following procedure for loosening the axle nut doesn't work, you may have to pursue a similar method to remove the nuts.
Set the emergency brake to assist in removal of the axle nut.
Loosen the rear wheel lug nuts on one wheel several turns.
Raise that side of the vehicle using a floor jack.
Remove the lug nuts and the rear wheel.
Remove the cotter pin for the axle.
Loosen and remove the axle nut as follows:
First try loosening the axle nut using an appropriate size socket (32mm or 36mm depending on the vehicle) and long breaker bar. If you're lucky the nut will come of easily and you can proceed to Step 7. If this doesn't work, continue with the next step.
Place the appropriate size socket on the axle nut. I recommend using an impact socket as a standard socket can easily be destroyed if significant torque is required to break the nut free.
Attach a breaker bar at least 24" long to the socket in a position parallel to the ground and rest the handle end of the bar on a jack stand (or something similar). Realize that to loosen the nut the breaker bar has to be pointed in the correct direction. For the left wheel, the breaker bar must be pointed toward the rear of the car. For the right side wheel the breaker bar must be pointed toward the front of the car.
NOTE
Make sure that the breaker bar and jack stand are positioned so that they can not damage any of the suspension components or body work when you lower the car.
With the socket and breaker bar in position, slowly lower the floor jack until the weight of the car breaks the axle nuts free.
If this does not work, borrow a 3/4" Drive Impact Wrench or take the car to a shop with a 3/4" Drive Impact Wrench to get the nut loosened.
Most early 944s are equipped with spacers on the rear wheels which must be removed.
Remove the rear brake caliper.
Release the emergency brake.
Using a Phillips head screwdriver remove the brake rotor retaining screws.
Remove the rotor. It may be difficult to remove. However, the rotor has two threaded M8 holes for bolts to be threaded into for jacking the rotor off of the hub. Remove the parking brake pads, spreader, and brake dust guard (4-19mm hex head bolts).
Remove the rear hub.
Using the 8mm cheesehead tool, disconnect the CV joint from the trailing arm and hang the axle out of the way.
ааааааааааа
Remove the stub axle using a gear puller or by driving it out with a block of wood and hammer. The inner spacer ring should come off with the stub axle. However, it will sometimes stick to the inner bearing seal. Remove the inner spacer ring and inspect it for scoring and replace if necessary.
Remove the inner and outer bearing seals using a seal puller.
ааааааааааа
Remove the snap ring next to the inner wheel bearing.
ааааааааааа
Using a soft drift and hammer from the outside of the trailing arm, gently tap on either side of the inner wheel bearing to drive it evenly out of the trailing arm.
Working from the inside of the trailing arm, tap on the outer wheel bearing using the drift and hammer to drive it evenly out of the trailing arm.
ааааааааааа
Remove the bearing spacer tube from the trailing arm and clean out all the old grease.
ааааааааааа ааааааааааа
Pack both new bearings with grease.
Install the new inner bearing using a socket as a driver or a soft face hammer. Make sure that the bearing goes into the trailing arm evenly to prevent binding. Also, make sure that the chamfered edge of the bearing is facing out (from the center of the trailing arm).
ааааааааааа
Install the snap ring next to the inner bearing.
From the outside of the trailing arm, pack fresh bearing grease into the trailing arm. Do not pack completely full. Allow room for installation of the bearing spacer and for expansion of the grease as it heats up.
From the outside of the trailing arm, install the bearing spacer tube.
Using a socket and hammer tap the outer bearing into the trailing arm. Make sure the chamfered edge of the bearing faces out.
ааааааааааа
Install the inner and outer bearing seals. Install the brake guard, parking brake pads, and spreader.
ааааааааааа ааааааааааа ааааааааааа ааааааааааа
Install the stub axle. Make sure the inner spacer ring is installed on the stub axle before you insert the stub axle into the trailing arm.
ааааааааааа ааааааааааа
Install the hub and axle nut. Torque the axle nut to 350 ft-lbs and install the cotter pin.
ааааааааааа
Install the brake rotor and secure using the Phillips head screws.


 ааааааааааа

 ааааааааааа
 ааааааааааа

 ааааааааааа
 ааааааааааа
  ааааааааааа

 ааааааааааа


 ааааааааааа
 ааааааааааа
  ааааааааааа
  ааааааааааа
  ааааааааааа
 ааааааааааа
  ааааааааааа
 ааааааааааа


