BODY-12, Door Handle - Removal, Installation, and Adjustment
Acrobat Printable Version
Introduction
There are many different procedures floating around describing how to replace the door handles on a 944 and every one of them will work. Some procedures will have you remove the door panel. Others will have you remove the door panel and the door latch mechanism. The factory service manual has you remove the door panel, window, and rear window track. Admittedly, the factory procedure makes replacing the door handle a snap. However, it requires a lot of time consuming removal which may not be necessary. Finally, there are procedures that describe removing the door handle externally without removing the door panel, window, or latch mechanism. Having never done a door handle before, I did not know for sure if this would work. Since I planned to replace my door handles with 968 door handles, I decided I'd remove and reinstall my door handle just to see if it could be all be done external to the door. Apparently, the confusion over the different procedures stems from the difference between vehicles with electric door locks and those which do not. If you have a vehicle with electric door locks, the door panel must be removed to disconnect the wiring going to the door handle. Otherwise, the door handle can be removed and installed completed external to the door. However, this does require a bit of dexterity and great deal of patience.
A door latch that is difficult to operate can be caused by several things. It can be a result of a misadjusted linkage between the door handle and the latch mechanism. It can also be caused by a mispositioned striker plate. We will discuss adjustment of both of these during this procedure.
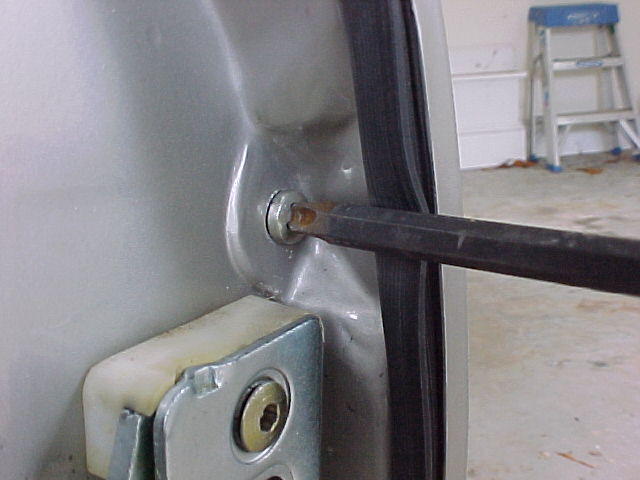
Remove the Phillips head screw just above the door latch mechanism (see picture).
From the outside slide the door handle toward the front of the car to disengage it from the door and then pull outward away from the door.
On the back side of the door handle you'll see a white plastic piece which is attached to a button on the door handle lock mechanism. Using a flat tip screwdriver, gently pry the white plastic piece off of the door handle.
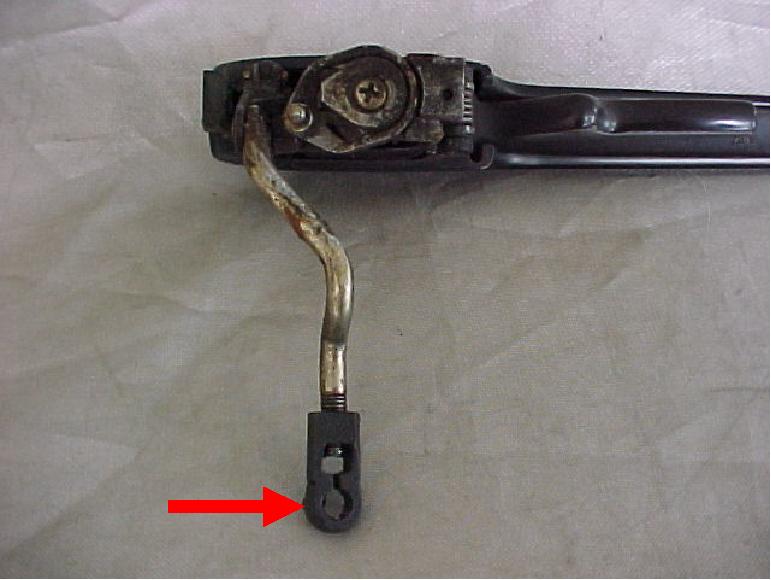
Next, you see the linkage rod running from the door handle down to the latch mechanism. On the end of the linkage rod, there is a plastic socket which attaches to a ball on the door latch mechanism. Slide the long flat tip screwdriver down between the linkage rod and the door latch. By prying gently with the screwdriver and rocking the door handle back and forth the socket will slide off the ball of the latch mechanism. The door handle can now be completely removed from the vehicle. The picture below shows the ball on the door latch with the handle completely removed.
NOTE
With the door handle removed the socket (shown by red arrow) which attaches to the ball on the door latch and the button (shown by the blue arrow) to which the white plastic locking device attaches can be easily seen.
2.0 - Door Handle Adjustment
If you are installing a new door handle the linkage may need to be adjusted to work properly. If you have a problem where the door latch will not operate using the exterior door handle, but will operate using the interior door handle, that means that the linkage from the exterior door handle is probably out of adjustment.
To operate the latch mechanism, the door handle linkage pushes downward on the lever arm of latch mechanism. If the linkage is too short, it will not push down far enough to operate the latch. If you are having the problem described above, remove the door handle and inspect the linkage including the socket at the end of the linkage. Operate the door handle with it removed from the vehicle to make sure the linkage moves downward when the handle is pulled. If everything is intact and appears to be functioning properly, the linkage may be out of adjustment.
To lengthen the linkage on the door handle, turn the plastic socket (shown by the red arrow below) at the end of the linkage rod counter-clockwise. This will made the entire linkage longer.
3.0 - Striker Plate Adjustment
Tools
5 mm Allen head socket or Allen head key
A door handle that is difficult to operate may be the result of a misadjusted striker plate. When the door is closed the latch mechanism should be very close to center on the striker bar as the door is closing. You should be able to see this using a flashlight with the latch just touching the striker bar (door not fully closed). To adjust the plate, loosen all three Allen head bolts and move the striker to the new position and then tighten the bolts. The striker plate adjustment is a much more delicate operation than it seems on the surface. Very small changes in striker plate position made a big difference in how the door mechanism operates. So, you may have to adjust the plate numerous times to find the ideal position.
4.0 - Door Handle Installation
Tools
Phillips head screwdriver
Long thin blade flat tip screwdriver
Flashlight
Procedure
During the door handle removal, the white plastic piece which was attached to the button on the door handle lock mechanism may have fallen so that is pointed straight down toward the bottom of the door. Before you can install the door handle the white plastic piece must be oriented so that it is point up. In other words, it should be visible in the larger door handle opening (see picture).
Make sure that the rear door handle gasket is installed onto the handle prior to attempting installation.
Insert the door handle linkage into the door handle opening. It will probably be necessary to turn the handle at an angle to get the linkage rod to fit into the opening in the door (see picture).
Align the socket on the door handle linkage with the ball on the latch mechanism. Place the tip of a flat tip screwdriver against the back of the socket and apply pressure while rocking the door handle back and forth. The socket should slide on to the ball. The thin blade screwdriver may flex too much to apply sufficient pressure. You may have to use a flat tip screwdriver with a thicker blade to press the socket onto the ball.
Next, insert the door handle far enough into the door opening to press the white plastic piece onto the button of the door handle lock mechanism. You may be able to do this with your finger or it may require pressing on with a flat tip screwdriver.
Install the small door handle gasket onto the front of the door handle. Insert the front of the door handle into the opening in the door. Then press on the back of the door handle to seat it in the rear opening.
Slide the door handle toward the rear of the car until it stops.
Install the Phillips head screw that holds the door handle in place (above the latch mechanism).