ENG-05, Camshaft (Timing) Belt and Balance Shaft Belt Removal


Acrobat Printable Version

Tools

Other Procedures Needed

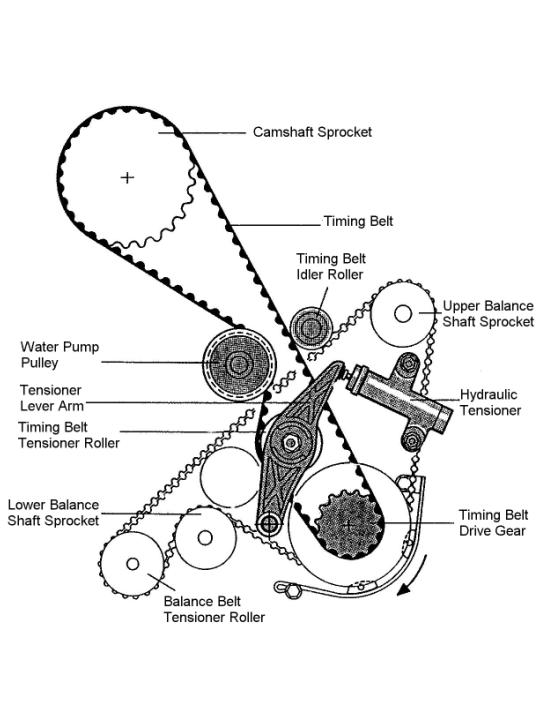
Refer to the Timing and Balance Shaft Belt Drawings for details:

Procedure

  1. Disconnect the battery negative lead.
  2. Position the number 1 piston to TDC.

  3. Disconnect the battery positive lead.

    NOTE

    It is possible to remove the timing belt with out removing the balance shaft belt gear on the crankshaft. However, it is extremely difficult to install the new belt with the balance shaft gear in place. Rather than risk damaging the belt, I prefer to install the flywheel lock and remove the balance shaft gear. If you choose not to, the steps associated with installing the flywheel lock, removing the crankshaft pulley bolt, and removing the power steering and balance shaft gears may be deleted.

  4. Using ENG-03, install the flywheel lock.
  5. Remove the alternator and power steering pump belts.
  6. On Turbo models, remove the turbocharger outlet line to the intercooler (Large diameter aluminum tube to which the air filter assembly is clamped).
  7. Using AF-01, remove the air cleaner housing and air flow sensor assembly as a unit.
  8. Remove the front engine cover to access the timing and balance shaft belts (The cover is two pieces and is attached by 10mm head bolts).
  9. Remove the crankshaft pulley bolt using a 24mm or 15/16" deep socket. Remove the power steering pulley. Remove the alternator/AC pulley and balance belt gear as a unit from the crankshaft.
  10. Loosen the balance shaft belt tensioner sprocket lock nut, then turn the tensioner nut counterclockwise to release the tension on the balance shaft belt.
  11. Loosen the balance belt idler idler roller lock nut, then rotate the idler to provide clearance for removal of the balance shaft belt.
  12. Remove the balance shaft belt and mark the direction of rotation on the belt if it is to be reused.
  13. If the balance shaft belt idler and balance shaft tensioning roller are to be inspected or need to be removed for other maintenance (i.e. water pump or oil seals), remove the locknuts and slide the rollers off the shafts.
  14. If the balance shaft sprockets need to be removed (i.e. water pump or oil seals), the sprockets will have to be locked in place to allow the retaining nuts to be loosened. Use the Balance Shaft Pin Spanner to hold the sprocket while loosening the retaining nut. You can also use two large punches and a set of locking pliers to hold the sprocket, but this is very awkward.
  15. After the retaining bolts have been removed, slide the balance shaft sprockets straight off the shaft. You may need to slide a small pry bar behind the sprocket to get it started.
  16. Using IGN-01, remove the distributor cap and the aluminum cover behind the distributor cap. This will reveal the main camshaft sprocket.
  17. If the timing belt is to be reused, mark the belt for direction of rotation before removing it.
  18. On cars not equipped with spring tensioners (pre-'87), perform the following:
    1. Loosen the camshaft tensioning roller lock nut and turn the camshaft tensioning roller nut beneath it in the clockwise direction to release the tension on the timing belt. Hold the flats on the tensioner roller with an open end wrench while loosening the locknut to provide counter-torque. Failure to provide counter-torque while loosening (or tightening) the locknut causes stress on the tensioner roller stud which can lead to long-term failure.
    2. Remove the timing belt, being careful not to twist the belt if it is to be reused. It may be necessary to remove the balance belt gear on the crankshaft to allow removal of the timing belt.
    3. If the camshaft tensioning roller is to be inspected or removed for other maintenance (i.e. water pump or oil seals), remove the lock nut and slide the camshaft tensioning roller off the shaft.
  19. On cars equipped with spring tensioners (87 Model Onward), perform the following:
    1. The front plate of the spring tensioner resembles a triangle. Loosen, but do not remove, the locknut and bolt on the side of the triangle near the tensioning spring.
    2. Remove the tension on the belt by pushing down on the tensioner lever arm. This can also be done using the factory balance shaft spanner if you have one. With the spring still compressed, tighten the locking bolt and nut. This will allow you to install the new belt without having to fight the spring tensioner.
    3. Remove the timing belt, being careful not to twist the belt if it is to be reused.
    4. If water pump or oil seal maintenance is being performed, the spring tensioner must be removed. Remove the entire spring tensioner assembly as a unit. The three bolts on the face plate of the spring tensioner are not used to remove the unit. There are three bolts (which are very difficult to see) at the back of the tensioner near the block which must be removed to get the assembly out.

      NOTE

      On spring tensioner cars, I find it very difficult to remove and install the timing belt with the spring tensioner assembly in place. I prefer to remove the spring tensioner assembly from the car during belt removal and reinstall while timing belt is being routed during installation.

  20. If the camshaft belt idler is to be inspected or removed for other maintenance (i.e. water pump or oil seals), remove the retaining bolt and the camshaft belt idler.
  21. If the crankshaft gear needs to be removed (i.e. water pump or oil seals), a gear puller is the easiest method. However, if a gear puller is not available, you can slide a pry bar behind the gear to get it started. If you use a pry bar, apply pressure gently so that you do not damage the rear timing belt cover (it's made of plastic).
  22. The back timing cover can now be removed by removing the 10mm bolts holding it in place. The back timing cover must be removed when replacing the water pump, front crankshaft oil seal, and the balance shaft oil seals.

Clark's Garage © 1998