ENG-10, Camshaft (Timing) Belt and Balance Shaft Belt Tension - Checking and Adjusting
Acrobat Printable Version
Tools
Jack stands
Floor Jack
Metric Socket set
Metric Wrench set
Porsche Timing Belt Tension tool (P9201)
Thin 24 mm and/or thin 27 mm open end wrench (depending on style of eccentric roller)
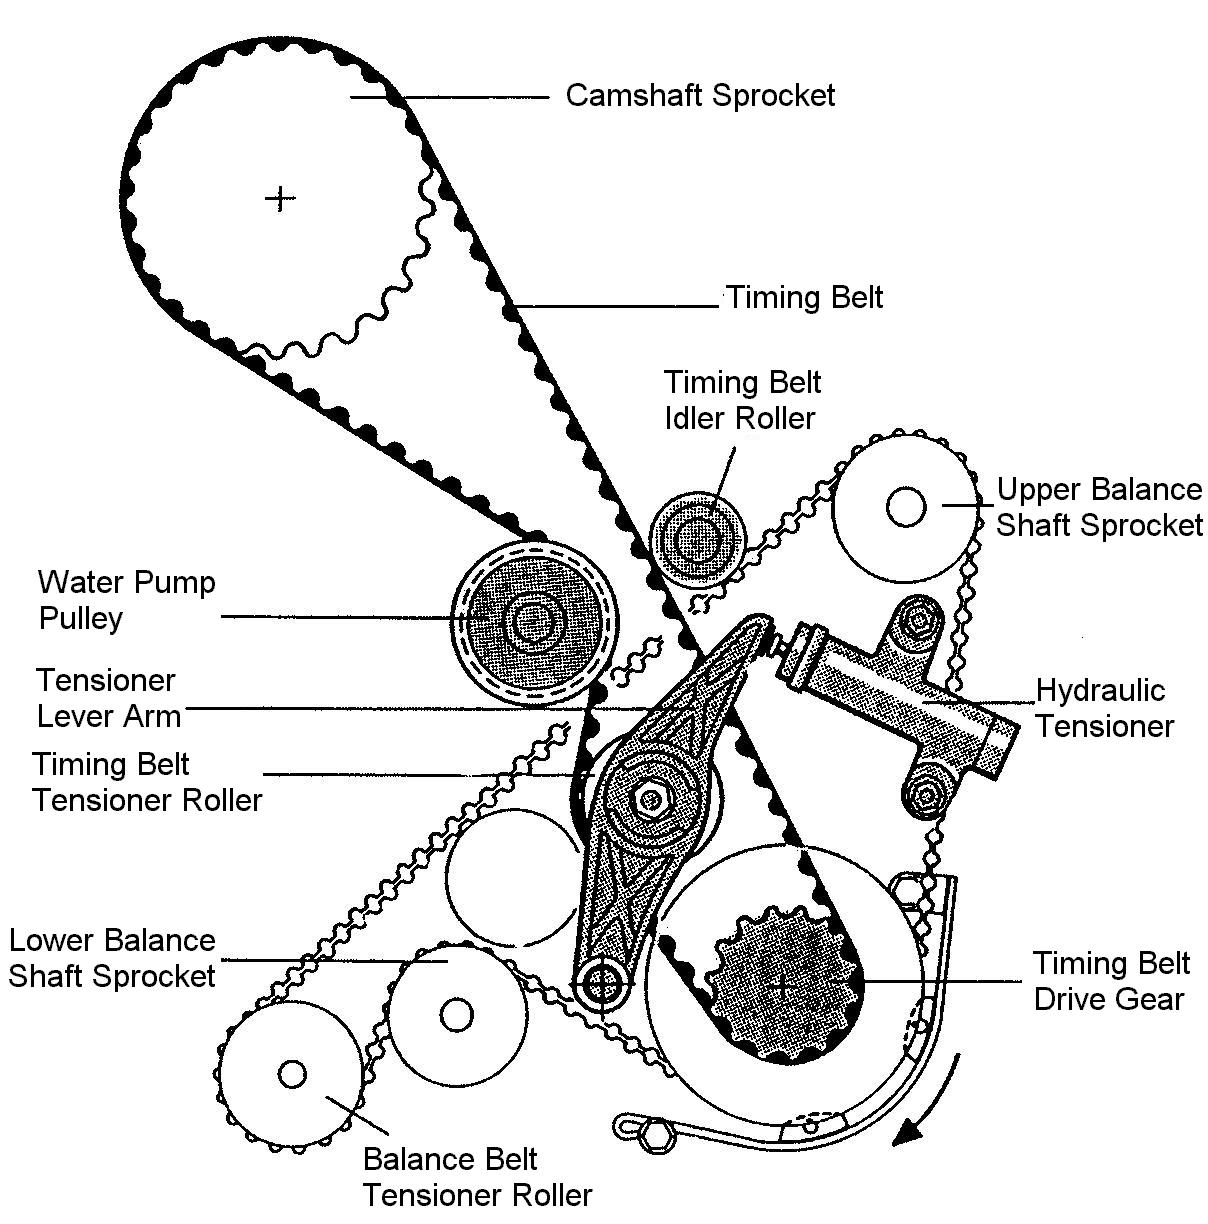
Refer to the Timing Belt Arrangement drawings below for details.
1983 - 1986 944 Timing Belt Arrangement
1987 - 1991 944 Timing Belt Arrangement
1992 - 1995 968 Timing Belt Arrangement
Procedure
Initial Tensioning on Belt Installation (1983 -1986 Model Cars Without Spring Tensioner)
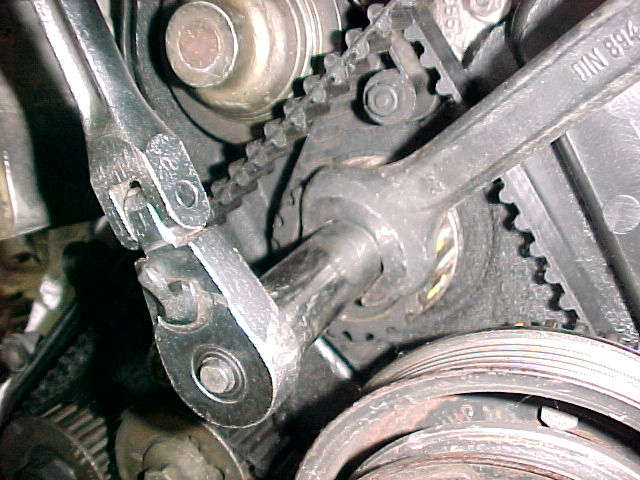
Pre-tension the camshaft belt by turning the tensioning roller eccentric nut (thin 24 mm or thin 27 mm open end wrench) counter-clockwise until the belt can be twisted 90° using the thumb and forefinger. This should be checked at the midpoint between the cam sprocket and the crankshaft sprocket. Tighten the tensioning roller locknut to 45 Nm (33 ft-lbs). Apply counter-torque to the tensioning roller eccentric nut while tightening locknut to prevent altering the belt tension.
Note: Originally, this was the only method of tensioning used on 928s and 924s. I know of several shops that have never purchase Special Tool 9201 and use this method on 944s as well. However, it is very risky and I strongly recommend checking the belt with the factory tensioning gage.
Belt Tensioning (1987 Model and Newer Cars With Spring Tensioner)
Release the spring tensioner by loosening the locking nut and locking bolt near the spring end of the tensioner.
Tighten the locking bolt and locknut to 20 Nm (15 ft-lbs).
Checking and Adjusting Cam Belt Tension (All Cars)
Yes, all cars. While some people contend that the tension does not need to be checked on cars with spring tensioners, I would disagree. From experience, I've found that spring tensioners vary from car to car and will not apply the same tension consistently when the spring is released. The spring tensioners seem to get close enough to the 2.7 ±0.3 spec for a used belt to be of little concern. However, the spring tensioner WILL NOT tension a new belt to within the tolerance for a new belt (4.0 ±0.3) unless the spring is released, the engine is rolled a degree or two, and then the tensioner is tightened down. The problem is that since spring tensioners tend to vary, you don't know exactly how many degrees to roll the engine. That's why it's important to check the tension using Special Tool 9201.
Procedure
After the camshaft belt has been pre-tensioned, remove the flywheel lock if installed.
NOTE
Do not install starter until crankshaft bolt is installed and torqued as the flywheel lock will need to be installed again.
Turn the engine clockwise two complete turns using the crankshaft pulley bolt (15/16" or 24 mm) and align the mark on the camshaft sprocket with the alignment tab in the window on the distributor housing (TDC). Verify that the crankshaft is also at TDC by checking the "OT" mark in the window on the bell housing.
Turn the crankshaft 10° counter-clockwise. This is approximately 1.5 teeth on the camshaft sprocket.
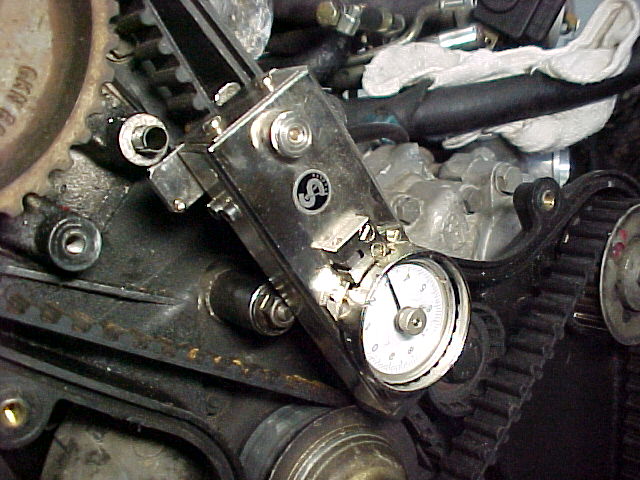
Check the belt tension using Special Tool 9201. Pull the lock pin on the tool to release the tension roller. Align the drag needle with the gage needle. Install the tool on the long section of the cam belt between the cam sprocket and the cam belt idler roller. Make sure that the tool's tensioning roller is on the toothed side of the belt.
NOTE
When checking timing belt tension, the timing belt tool is installed such that the gauge on the tool is oriented upside down. It also requires the flat bars on the tool to slide between the timing belt and the timing belt cover which is a snug fit. This is perfectly acceptable.
Push the tensioning roller against the cam belt until the locking pin on the tool engages. Read the tension on the dial.
Tension specs:
New belt - 4.0 ±0.3
Used belt - 2.7 ±0.3
Adjusting tension on cars with eccentric roller tensioners:
Adjust the belt tension by loosening the tensioning roller locknut and turning the tensioning roller eccentric nut (thin 24 or thin 27 mm open end wrench) counter-clockwise and tighten locknut. Apply counter-torque to the eccentric roller when tightening locknut to prevent altering torque.
Repeat the steps above until the cam belt tension is within the specified tolerance.
Torque tensioner locknut to 45 Nm (33 ft-lbs).
Adjusting tension on cars with spring tensioners:
On the front plate of the spring tensioner there are three fasteners. One holds the roller in the tensioner. The other two are used to tension the belt. To tension the belt, simply loosen the lock nut on the pivot arm (top fastener) and the locking bolt (lower). You'll notice a slot behind the head on the lock bolt. Loosening the lock nut and bolt allows the tension to be released on the spring to retension the belt.
Using a pry bar or balance shaft pin spanner, you may want to gently nudge the tensioner in release direction (i.e. more tension on the belt). Sometimes after sitting for a while the spring tensioners like to stick. Once you're satisfied that the tensioner has released, tighten the tensioner lock nut/bolt.
Spring tensioners tend to be a bit unreliable as far as consistency in tensioning. I recommend checking the tension with the factory tool, the twist method (described previously in this procedure), or with an aftermarket tension tool (i.e. Optibelt, Market, etc.)
NOTE
The intended tool for this purpose is the balance shaft sprocket pin spanner (P9200). The spanner pins fit into two holes on the front of the spring tensioner body.
Balance Shaft Belt Tensioning (All Cars)
Determine the amount of belt tension required for the type of belt you have.
Old style belt (15 mm wide) - 2.7 ± 0.3
New style belt (18 mm wide) - 3.5 ± 0.5
Loosen the locknut on the balance belt idler roller and move it away from the balance belt. It should not come in contact with the belt while checking the tension or during tension adjustment.
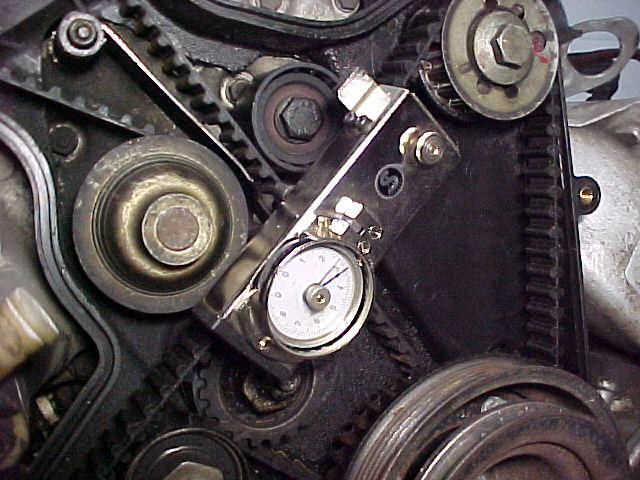
Check the belt tension using Special Tool 9201. Pull the lock pin on the tool to release the tension roller. Align the drag needle with the gage needle. Install the tool on the section of the balance belt between the lower and upper balance shaft sprockets.
Adjust and recheck the belt until the tension is within the specified limits.
NOTE
If you have someone to help you it is possible to adjust the belt tension while the tensioning gage is installed. However, the tension should be checked again after the tensioning roller locknut is torqued.
When the belt is set at the proper tension, tighten the locknut to 45 Nm (33 ft-lbs). Apply counter-torque to the tensioning roller to prevent changing the belt tension.
Adjust the balance belt idler roller such that the clearance between the roller and the belt at the lower balance shaft sprocket is 0.5 mm. This can be done with Special Tool 9207. I normally use a 0.5 mm feeler gauge. When properly adjusted, torque the locknut to 45 Nm (33 ft-lbs).