Acrobat Printable Version
|
|
HVAC Operation
This procedure will concentrate primarily on the operation and malfunctions of the late model 944 HVAC system (1985.5 and newer). That's primarily because the early HVAC system are of a much simpler design and is much less prone to malunctions. There's also not a great deal of information in print on the operation of the early HVAC systems. As more definitive information on the early 944 HVAC system becomes available, I'll be adding to this procedure.
The early 944s have separate heating and A/C systems which provide air flow to a common mixing chamber. Each system has it's own housing and blower. Air flow through the system is contolled by flappers which are operated by cables. The heater control valve is also controlled by a cable. So, when there's a problem with the system where there's no heat or excessive heat, it's normally due to a broken or disconnected cable.
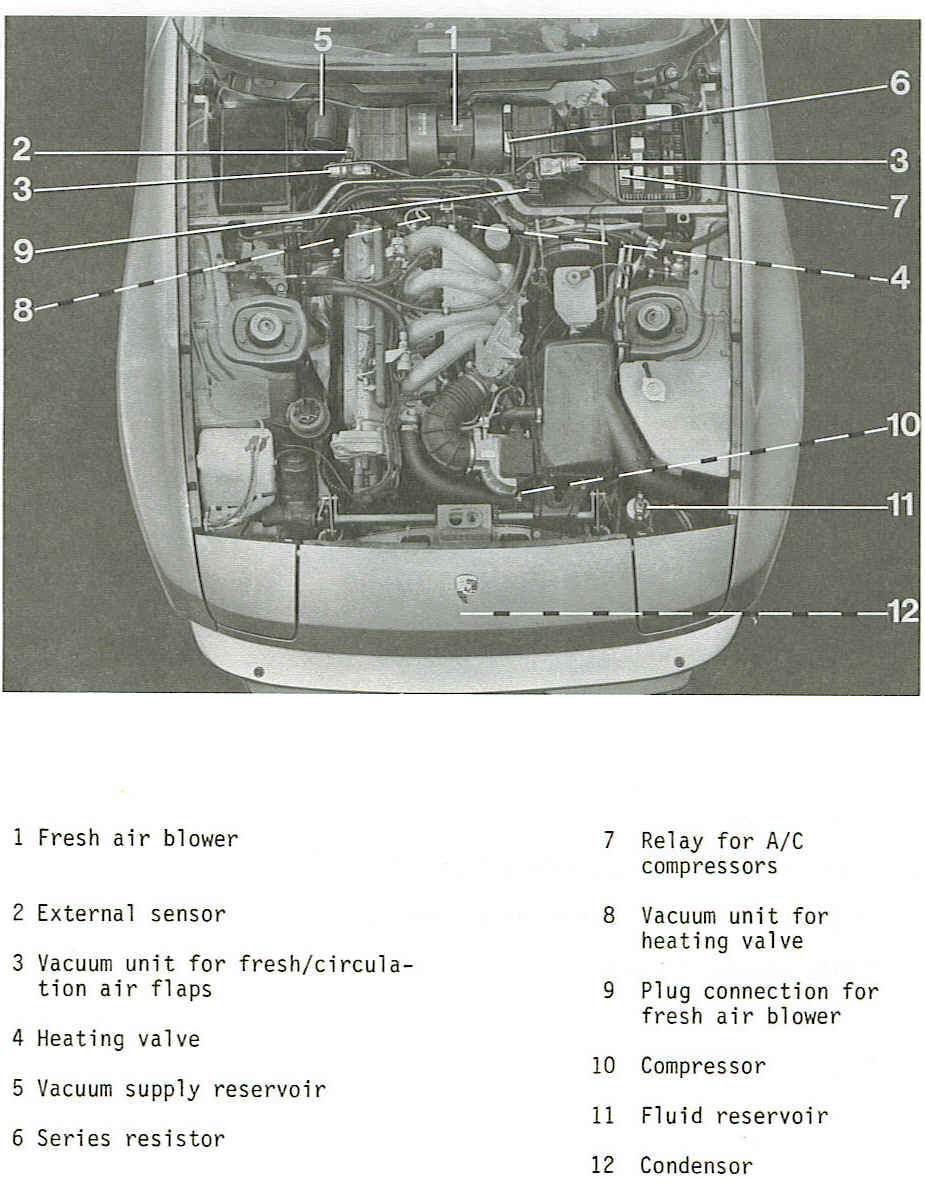
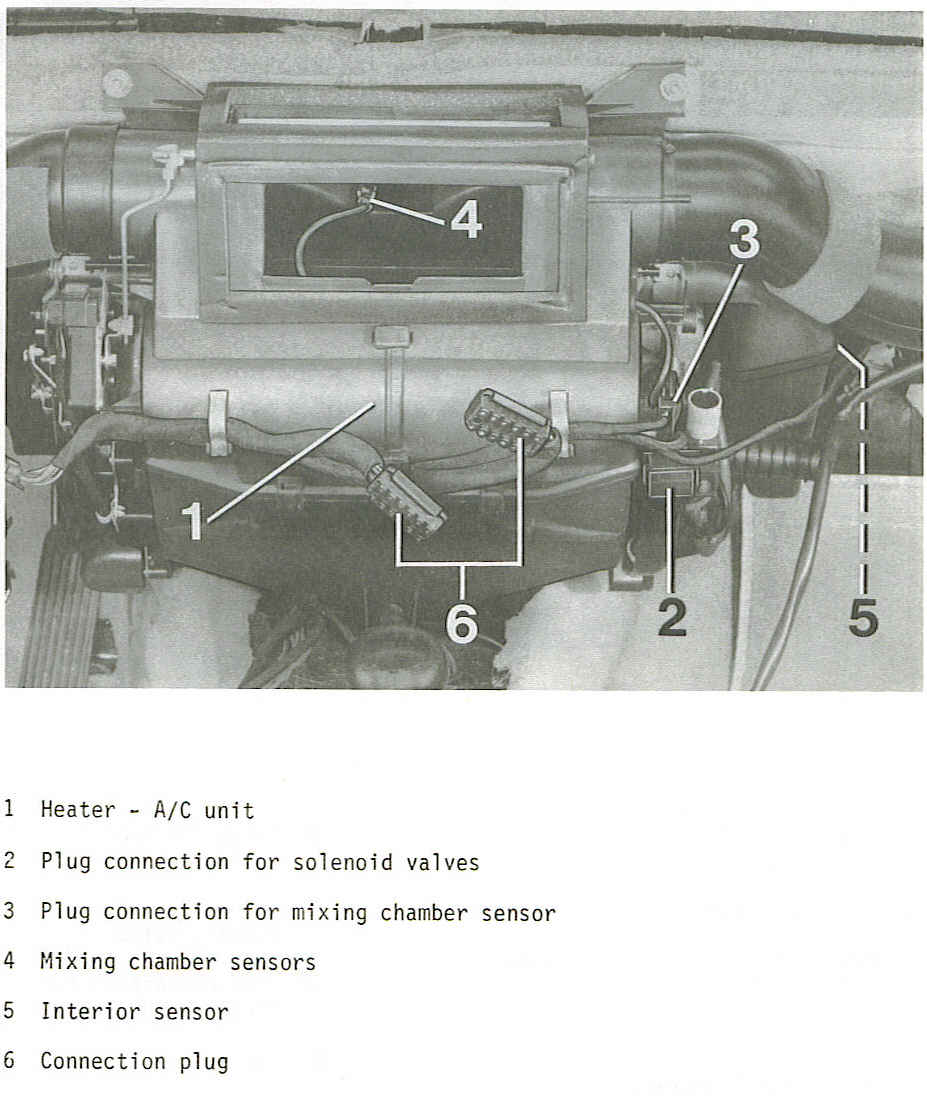
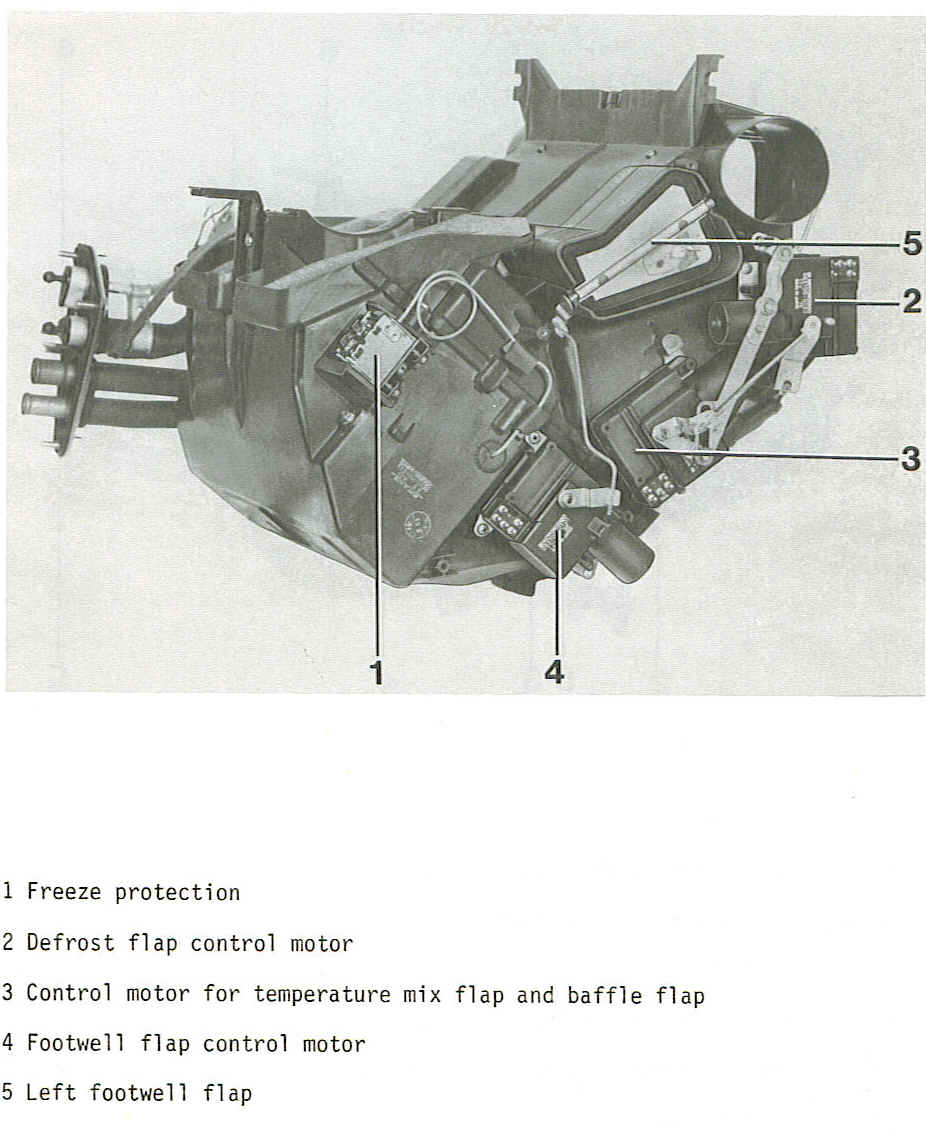
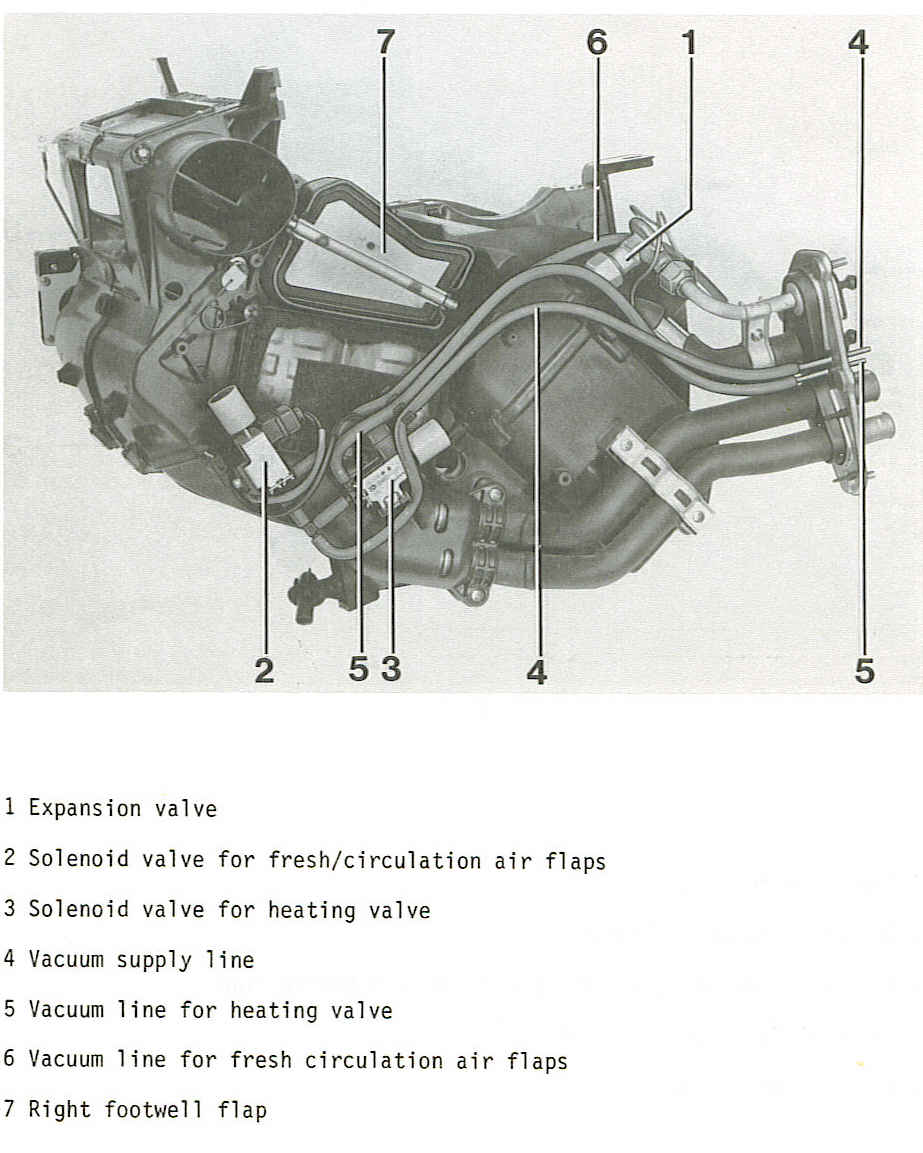
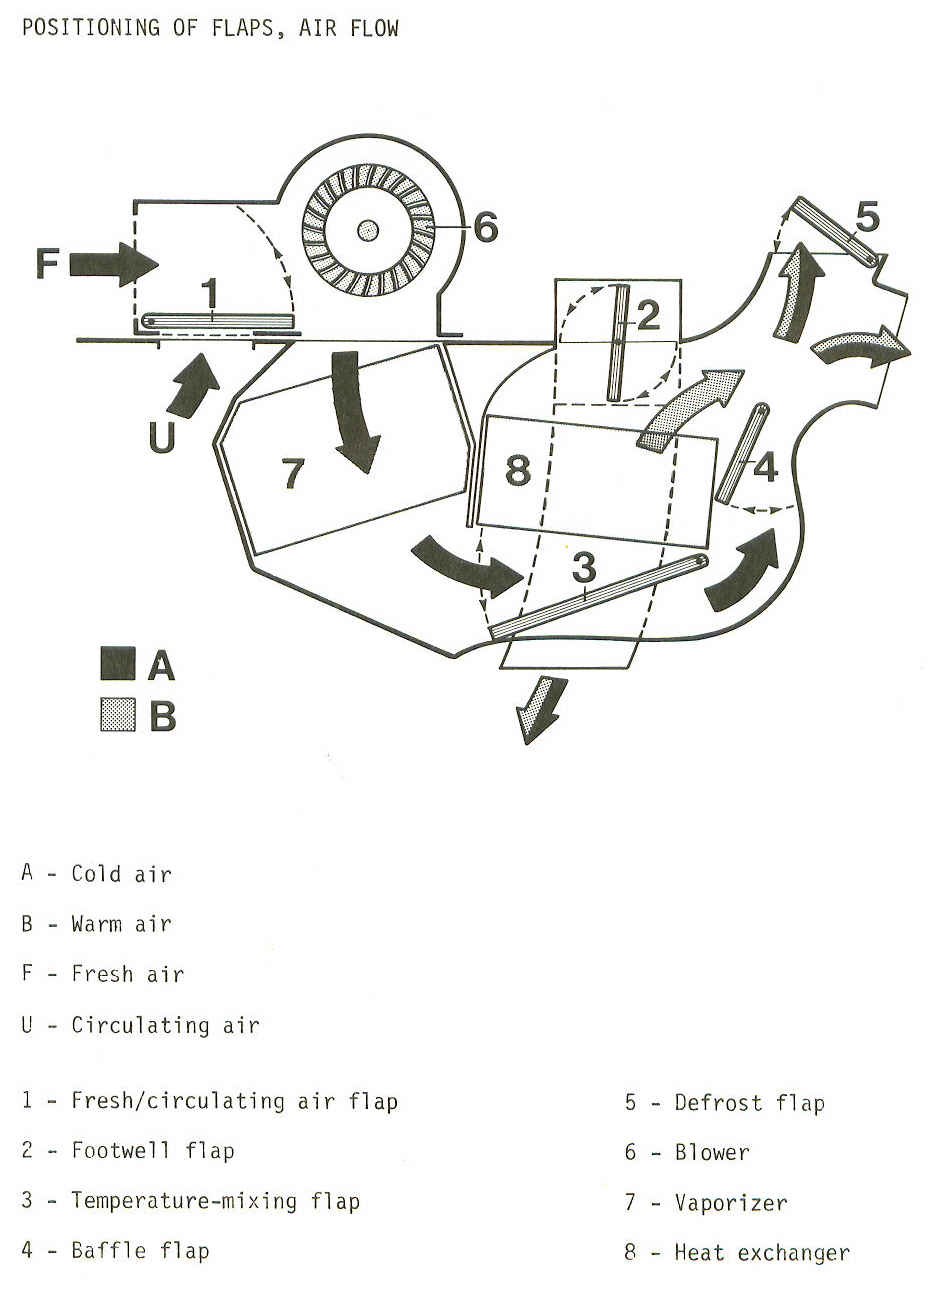
On the later model 944 HVAC systems, the A/C evaporator and heater core are contained in the same housing. Temperature control is automatic and is controlled by 3 temperature sensors. Once a temperature is selected it is maintained automatically by the temperature control unit repositioned dampers to control air flow through the unit. The temperature control unit determines how to position the dampers by comparing the signals from the three sensors. Once sensor senses outside air temperature. All air flow therefore passes through the A/C. From there it is either directed fhrough the heater core or bypassed the heater core (via a system of flappers) and into the cabin. Below are pictures of the late model 944 HVAC component locations.
 |
 |
 |
 |
 |
 |
Full Heat at All Temperature Settings (Pre-1985.5 944s and All 924s)
On the early 944s pre-1985.5 full heat problems are somewhat unusual. However, when it happens, it is normally caused by the bowden cable for the heater unit damper coming loose. This will be much easier said than done but, you'll need to locate the bowden cables on the back of the heater controls on the center console and follow them until you locate the correct damper. There should be three cables. One for the heater unit damper, one for the AC unit damper, and one for the heater control valve (the heater control valve cable will go through the firewall). The damper for the heater unit is behind the center console. And, the AC unit damper is on the passenger's side of the vehicle. So, locate the cable for the heater unit damper and see if it is disconnected or broken.
Full Heat at All Temperature Settings (1985.5 and Newer 944s)
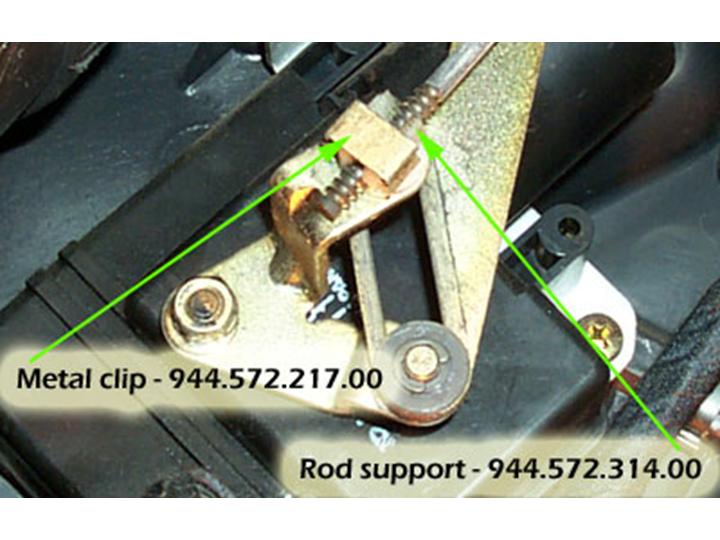
On late model 944s (1985.5 and newer), there are several problems that can cause the full heat condition. The first and most common problem is a damper linkage in the driver's side footwell (for left-hand drive cars). Stick your head in the footwell and look up and toward the center console. You should see a small diameter metal rod which rests in a white plastic support and is held in place by a metal retaining clip. On later model 944s, there are two damper linkages instead of one and they are located behind a plastic cover. One of the plastic clips on the linkage may be broken preventing the linkage from operating the damper. When the damper fails to operate, the system fails to full heat. Most German cars are designed to fail this way. It's a safety feature to keep you from freezing in winter. The first picture below shows a linkage that has come loose from the support because the metal clip is broken. The second picture show the linkage properly in place with a new support and clip along with the part numbers for the support and clip.
The second problem is with the heater control valve. The heater control valve is vacuum operated and located at the back of engine near the firewall. There is a vacuum line which goes from the valve to a vacuum connection at the firewall where the heater hose connections penetrate the firewall. Check this vacuum line to make sure it is connected and doesn't show any signs of cracking. There is another vacuum line fitting near the heater hose connections which goes to a rubber "Y" connector. One side of the "Y" goes to a small check valve attached to the large brake booster vacuum line at the back of the firewall. The other side of the "Y" goes through the firewall to a plastic vacuum retention canister next to the battery. Make sure all these lines are connected and don't show any signs of cracking. If all vacuum lines are properly connected you may wish to remove the heater control valve from the system and check it's operation with a vacuum tester. A problem with the heater control valve opening may also be caused by the vacuum solenoid valve going bad. Remove the solenoid and apply 12 VDC to valve to see if it opens and closes properly. If you look at the picture titled HVAC UNIT RIGHT SIDE above, the solenoid is component #3.
Finally, a full heat condition can be caused by a failure of the Temperature Control Unit (TCU) itself. Unfortunately, I don't have a good way to test the TCU at the moment. And, they're quite expensive unless you can find one from a car that's being parted out. So, replace the TCU as a last resort.
Intermittent Heat
If your car's heater works fine while driving down the road but the air from the vents becomes cold at idle, you probably have air in the coolant system. Air pockets in the coolant system often accumulate in the heater core. At higher engine RPMs the coolant pump will develop enough discharge head to force some coolant through the heater core. However, at idle, the air pocket will keep coolant from flowing through the core. If you are experiencing these symptoms, vent the coolant system using the COOL-02, Coolant System Draining, Filling, and Venting.
Clark's Garage © 1998