The following steering rack rebuild procedure was written by Karl "Doc" Wilen. I'd like to thank Doc for taking the time to write this procedure and take pictures to go along with it.
Foreword by Author
The following details how I resealed my power steering rack. A seal kit can be gotten from Travis at www.rennbay.com for about 70 bucks. A rebuilt rack can be acquired for 225-250 with core exchange, so if you want to try and reseal yourself and save some money, you can find instructions here, on Rennbay's site, and also on www.arnnworx.com.
Doc Wilen
Tools
Good selection of metric sockets and a few long extensions for removing and replacing the wiper seals.
Using STEER-01, remove the steering rack from the vehicle.
Have a large CLEAN workspace with a lot of clean rags or a roll of paper towels or both. Lay out the seal kit on a strip of paper towels, so you can easily match up the seals as you remove them from the rack. I found it easiest to remove one seal at a time, match it up, put the new one on the rack, and move on to the next one. When you remove an old seal and match it up, place it off to the side somewhere where it will not get mixed up with the new seals. On some o-rings it is hard to tell the old ones from the new ones if you are not careful.
With the rack on the workbench, remove the hard lines using an Allen wrench. (I had to use a vise-grip on 1 bolt due to it being stripped. These can be on pretty tight. They need to come off, because there are 2 rubber o-rings per fitting that need to be replaced, for a total of 8 rubber o-rings.
Using a punch and a hammer, removing the locking collar that holds the 2 halves of the rack together. It will just screw off. In the picture below, you can see the collar has been removed and slid back on the bronze tube. The bronze tube (steering sleeve) will then separate from the gray control tower. Note the hard lines had not been removed yet when this picture was taken.
Remove rubber boot from the top of the control tower that surrounds the spindle, then remove the three 10mm bolts. You can then carefully pry the top off of the control tower. The top will have 1 wiper seal in it, and an o-ring as seen below. Note the orientation of the wiper seal before you remove it. The groove side will be on the inside of the tower, with the flat side pointing outward.
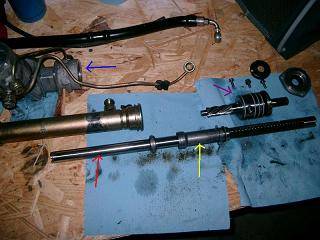
Grab the steering gear where the steering shaft normally attaches, and turn the gear counter clockwise while pulling up on the gear, the main unit will slide out of the control tower, also allowing the steering rod to be pulled from the control tower as well. The following picture will show all the pieces apart.
The yellow arrow is the shuttle
The red arrow is the steering rod
The purple arrow is the steering gear
The blue arrow is the control tower
The gray arrow that is hard to see is the steering sleeve
These are probably not the official names.
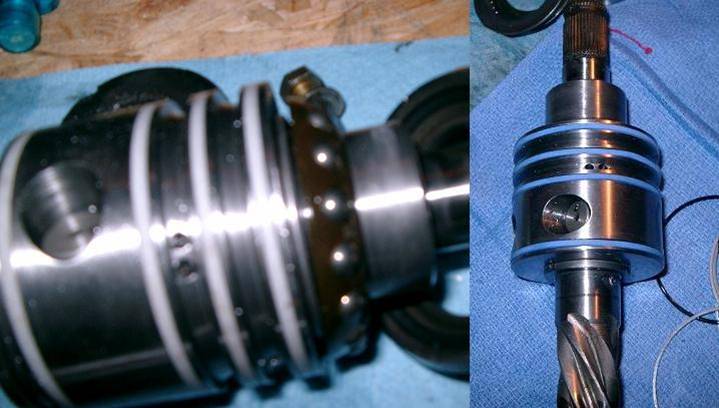
The steering gear. Once removed from the control tower, make sure you keep the spacers and bearings lined up in the proper orientation. One the gear itself are 4 hard plastic rings (white). Underneath each is a standard rubber black o-ring. Remove these with a pick and replace them with the new seals. The left picture shows before, and the right picture shows them replaced. The new hard plastic rings are blue.
The control tower: After you remove the steering gear, there is a wiper seal at the bottom that needs to be removed. This is a real pain in the butt to remove, because you can't get a socket behind it to hit it out. Destruction may be the only way to get it out, just make sure not to nick the edges of the control tower. Again the groove faces upwards as you are looking at the seal from the top. This is the HARDEST seal to get out of the rack. And it is a very important seal, as it keeps fluid from leaking out of the rack on the driver's side. Chances are you will nick the metal casing when trying to remove the seal, and if you do so, the rack will most likely leak when you get it back in the car. Then you get to drop the 250 for a rebuilt rack.
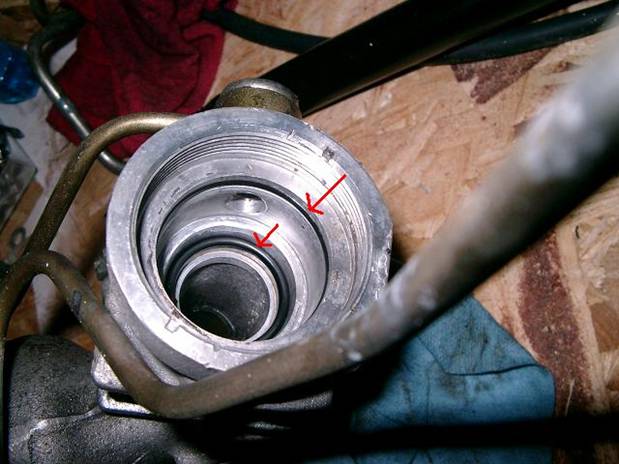
On the passenger side of the control tower, there is a large o ring in a groove that needs to be replaced. The smaller one you see actually came off the end of the shuttle, and belongs next to the white spacer that sits on the outside of the shuttle.
The steering shaft and shuttle. There is a shuttle that slides back and forth on the steering shaft itself. Inside the shuttle is a wiper seal and hard white rubber spacer. To remove the shuttle from the steering shaft, you must remove 2 snap rings, a couple of washers, and another seal mechanism.
Again there is a hard white rubber ring on the outside of the seal mechanism, and a rubber o-ring underneath that. Also when you slide the washers off the shaft, there will be another 2 rubber o-rings underneath. Once all those are removed, the shuttle can be removed. You could also force the shuttle off over the teeth on the steering shaft, but you would not want to put on the shuttle in that direction due to possibly hurting the new wiper seal. In the picture below, the right picture shows the seal mechanism and the shuttle in place on the shaft. The shuttle is pushed all the way against the seal mechanism. In the left picture, half the seal mechanism is removed (there is still 1 washer and 1 snap ring on the shaft), and it shows the 2 o-rings underneath it. Again that blue plastic seal replaces the white seal that was originally on the unit.
The shuttle. Remove the shuttle from the steering shaft. Inside is a wiper seal and a hard plastic spacer underneath it. Using the appropriate sized socket, pound the seal out of the shuttle, and install the new spacer and seal. Again the groove in the wiper seal will face out, or toward the passenger side of the vehicle.
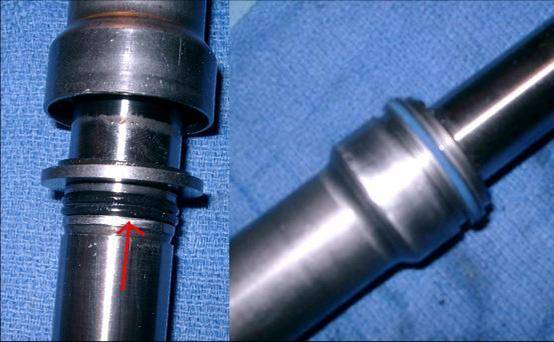
On the outside of the shuttle is a hard plastic ring, and a rubber o-ring that holds the ring onto the shaft. In the following picture, the plastic ring is on, but the o-ring is currently removed (it is actually seen in a previous picture if you read the description.) The o-ring will go on the outer side of the plastic ring (in the picture, to the right).
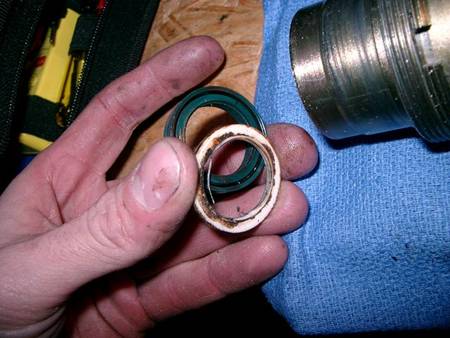
The bronze steering sleeve. Inside is a wiper seal, a plastic spacer, and a plastic guide ring. The plastic guide ring is removed first, using a small pick and needle nose pliers. When I removed it, I thought I was going to break it, but it seemed to flex pretty easily and come out.
Next, take the appropriate size socket and knock out the wiper seal and spacer. Note, the tube size steps down as it gets closer to the seal, so if you put the tightest fitting socket in the end of the sleeve and try to pound out the seal, you will be hitting on the sleeve itself, and the seal won't move. I had use a socket that was a little smaller. The seal came out in about 3 hits.
Again the groove on the wiper seal will face towards the control tower, or drivers side of the vehicle. This is looking in from the long end of the tube. The seal will be hit from the opposite end, and come out towards you (as if you are looking at this current picture). You can see the groove in the seal. The white rubber spacer is behind the wiper seal.
The above picture is misleading (not how it will come out of the sleeve), as the wiper seal is turned the wrong way, it should be flipped so that you are look at the back of the seal (flat side).
That is about it for seals that need to be replaced, install everything in the opposite direction. Make sure you use the correct size socket to install the seals (and make sure they go in the right way, if they are installed the opposite direction, they will leak). Make sure you pound the seals in evenly. The seals went in pretty easily for me.
Total time to replace the actual seals is probably an hour or 2 if you take your time. The pictures are kind of hard to understand if you haven't had your rack apart yet, but once you get it apart, everything is pretty simple. There really is no way to mix up the seals, as the sizes are all pretty different. The write up is not perfect yet, but should be able to help anyone currently trying this procedure.